


Displaying items by tag: UK Sailmakers Ireland
'We're Sewing as Fast as We Can': UK Sailmakers Delivers Gowns to Care Homes & GP Surgeries
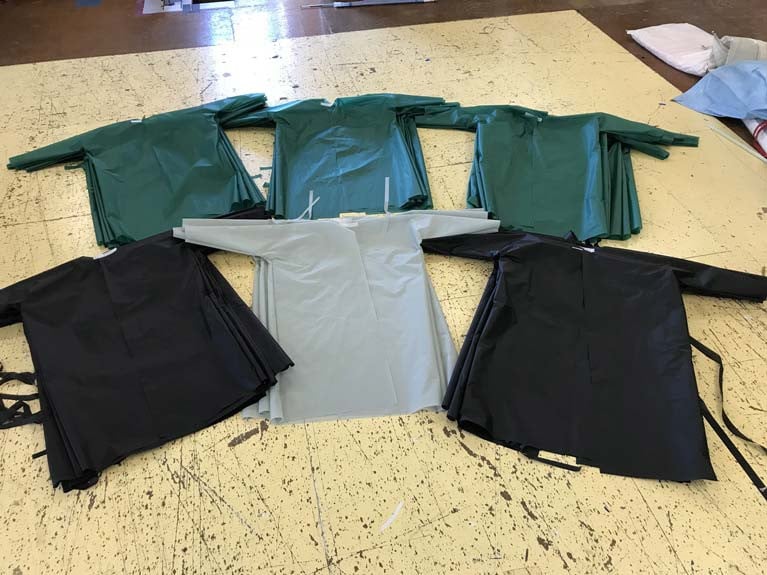
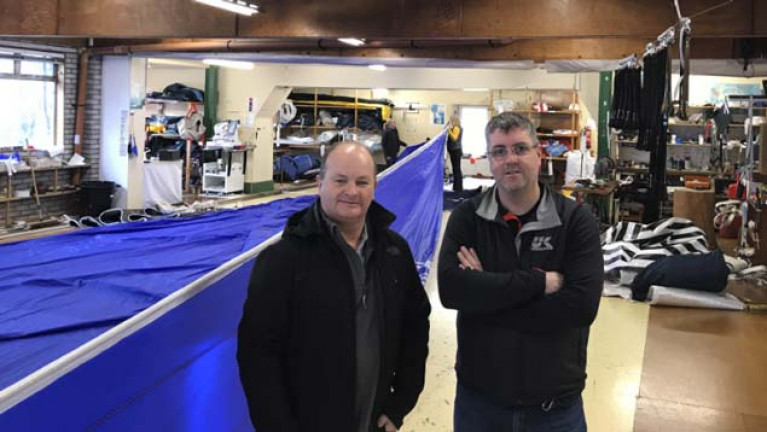
Barry Hayes of UK Sailmakers Ireland reports that gowns (pictured above) made at his Crosshaven sail loft are destined for care homes and GP surgeries across the country in the fight against COVID-19.
'Our not-for-Profit makeshift gown making endeavour has also just secured a contract with the HSE to supply our healthcare heroes', he said on social media.
'We‘re sewing as fast as we can to keep these frontline services supplied!' Hayes adds.
As Afloat reported previously, the Cork Harbour sailmaker joined the fight against Covid-19 and are deploying their resources to help make Personal Protective Equipment (PPE) for local healthcare workers at the front line in the fight against this disease. 'Primarily, we are doing this to help fill the gaping hole between demand and supply of PPEs for healthcare workers', Hayes said.
UK Sailmakers Join Fight Against Covid-19 with Gown Manufacture at Crosshaven Sail Loft
Cork Harbour sailmaker Barry Hayes and his UK Sailmakers firm at Crosshaven have joined the fight against Covid-19 and are deploying their resources to help make Personal Protective Equipment (PPE) for local healthcare workers at the front line in the fight against this disease.
'Primarily, we are doing this to help fill the gaping hole between demand and supply of PPEs for healthcare workers', Hayes told followers on social media.
First conceived by UK Sailmakers Norway, the UK lofts in New York, Canada, the Irish loft has made refinements on the design and material selection. Hayes is currently sourcing cloth to create the gowns.
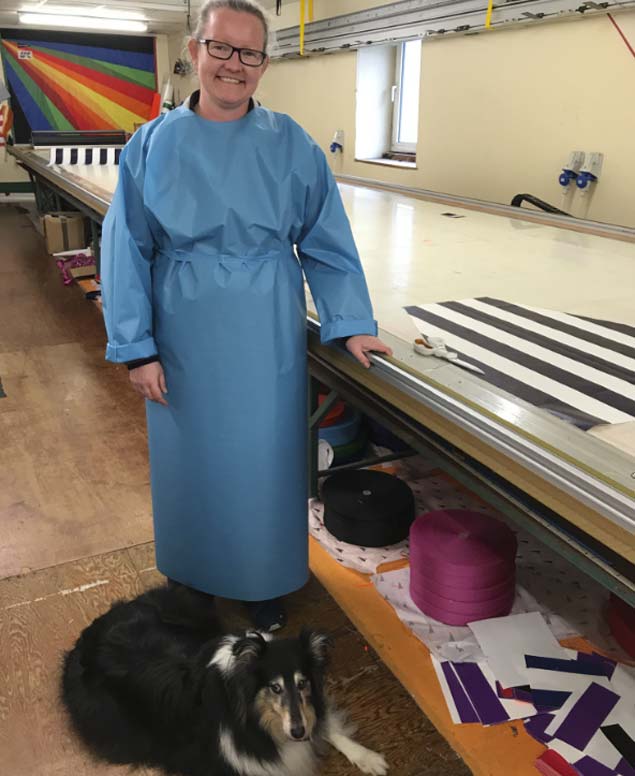 The UK Sails gown prototype is modelled at the Crosshaven loft by Clare Hayes, much to the approval of the loft Sheltie, Layla
Flying Jibs v Code Zeros on IRC Rating
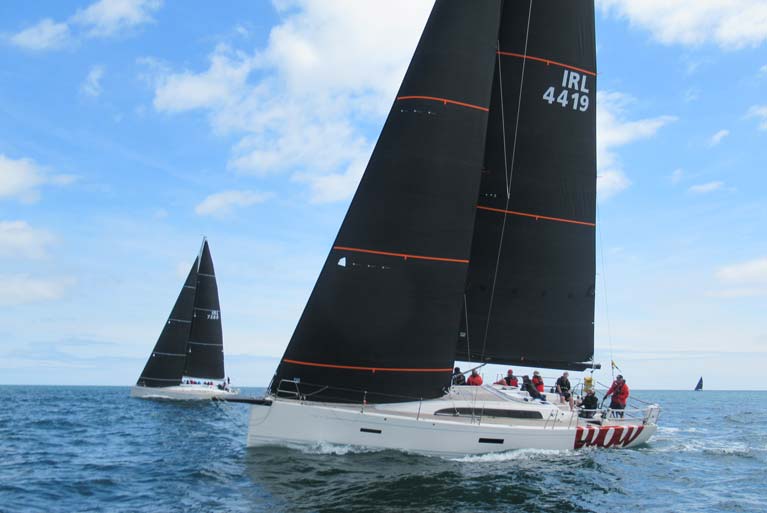
UK Sailmakers Ireland’s Barry Hayes looks at the differences between Code Zeros and Flying Jibs on IRC, what are the best angles for each and tips for using them. Both sails are used reaching, but at what angels and why are they effective?
Flying Jibs
Flying jibs are the newest additions to many sail inventories and provide an effective reaching sail selection when the angle is too tight or there is too much wind for a Code Zero. Importantly, there is no penalty on IRC for having a flying jib. The main difference comes into play when you’re cracked off in heavy airs, where you can keep the Flying Jib up powering the boat up without all the heeling the Code Zero would have generated.
Flying jibs are the same size in area as your J 1 headsail and are set flying off the bow on a cable, normally off the end of the bowsprit. The head of the flying jib is normally set level with the top of the forestay. This gives it the best aerodynamic set up as the sail is far enough away from the forestay (a metre or so) so as to not affect the headsail or backwind the mainsail.
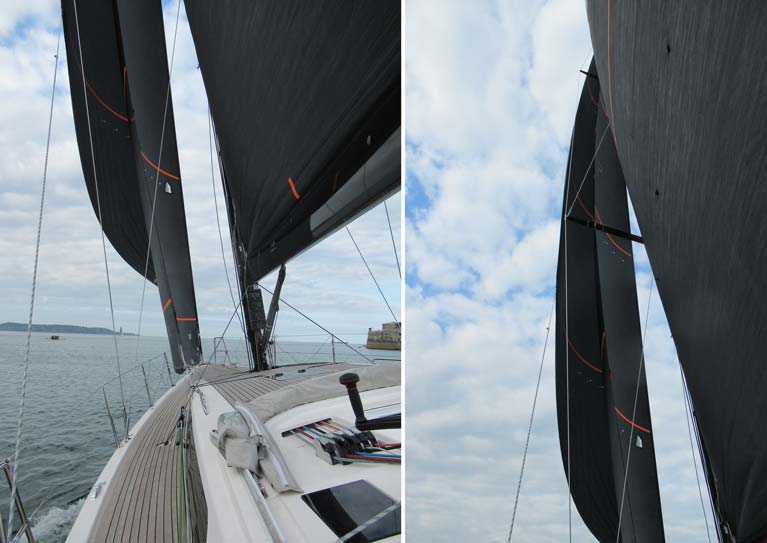
The Flying Jib is less than half the area of the Code Zero resulting in a lot less aerodynamic drag on the sail. The overlap is a lot less as well, so you can push the flying jib much higher and harder than a Code Zero. The halyard tension is quite low compared to a code zero as is the sheet load.
The shape of the Flying Jib is relatively full, normally the same shape as a J 2 headsail with a hollow leech to meet the IRC rule of less the 50% of the LP. The sheeting point is well behind the keel near the genoa winch, but not to the stern of the boat. As you don’t have full control of the sheeting angles for different wind angles, I’ve found that sheeting it at a point ¾ of the way back along the deck is the best spot. If possible, this sheeting location can be adjusted slightly while reaching to open and twist the leech while upwind you want the leech more closed.
The normal upwind sailing angle for a flying jib is around 45 degrees true in up to 8 kts of wind and as broad as 100 degrees for winds of 20 + kts. If you’re sailing broader than 45 degrees in 8 kts, you’re bearing away and adding a lot of speed to the boat. At 60 degrees true in 14 kts, which is too much wind for a Code Zero, you’re normally sailing a full knot faster than with just a headsail.
A Flying Jib always hoisted and dropped to windward. It’s set using a cable and furler system with a ratchet at the bottom. The clew will usually have a Velcro patch it to keep the sail closed once it’s furled tightly. This lets you leave it up so you can open or close the sail when it’s needed. I normally attach only one sheet to the sail as you never tack it without furling.
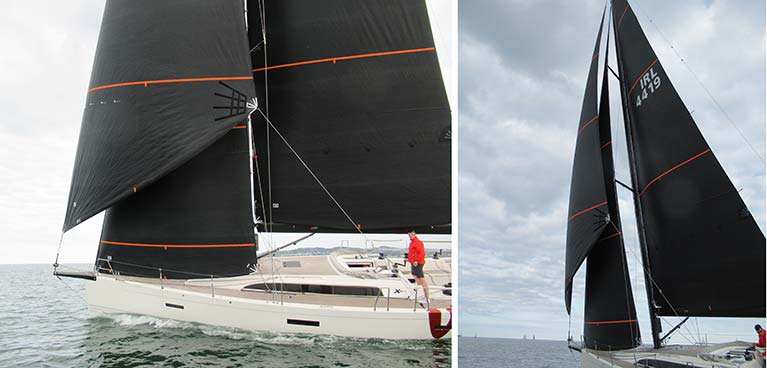
Code Zeros
Today’s Code Zeros are the go-to sail for offshore sailing because they are versatile and easy to handle. One of the great uses of the code zero is at night or offshore when you are racing. It’s an excellent sail when it’s too windy to hoist the kite, and, when you broach, you just furl the sail up and get back on the road.
Nearly all Code Zeros are set and doused using a top-down furling system with a cable in the luff. The reason for top-down is that it gets the furl tight onto the cable so there isn’t a big roach hanging out of the leech when its furled. You can hoist a Code Zero and leave it up, furling and unfurling it as needed.
The Code Zero is much bigger than a Flying Jib and it has double the power. The sail is normally sheeted to the same point as the Flying Jib, ¾ way back the deck by the genoa winch, with one sheet on the sail for ease of use. This also keeps the spinnaker sheets free to use as needed.
The true wind angles and wind speed range of most Code Zeros are from 45 degrees in 6 kts. to as broad as 110 degrees in 20 kts. You can also use them at lower angles in heavy airs, like 160 degrees in 30+ kts., and you can simply roll it up if you get into trouble.
The design of the Code Zero is similar to a flat A3 asym with a mid-girth greater than 75% so it fits in the IRC rule. The leech carries quite a bit of twist allowing you to open and close the leech as need.
In this video attached you can see a top-down furling Code Zero
You can see the head of the sail furling onto the cable while the tack stays free allowing the main body of the sail to create a tight furl on the cable.
Top benefits:
Flying Jib
• 45 to 100 degrees true
• Cable and sheet low load.
• Can but used in higher wind strengths and angles
Code Zero
• 45 to 110 degrees true or 130+ in heavy air
• Cable and sheet high load.
• Can but used in lower wind strengths and angles
The cable and the furler you use in both sails are the most important part of the system. Some furlers can cost more than the sail, and they also may not work as effectively as they say they can. It’s always best to buy a furler that has a top-down option specified.
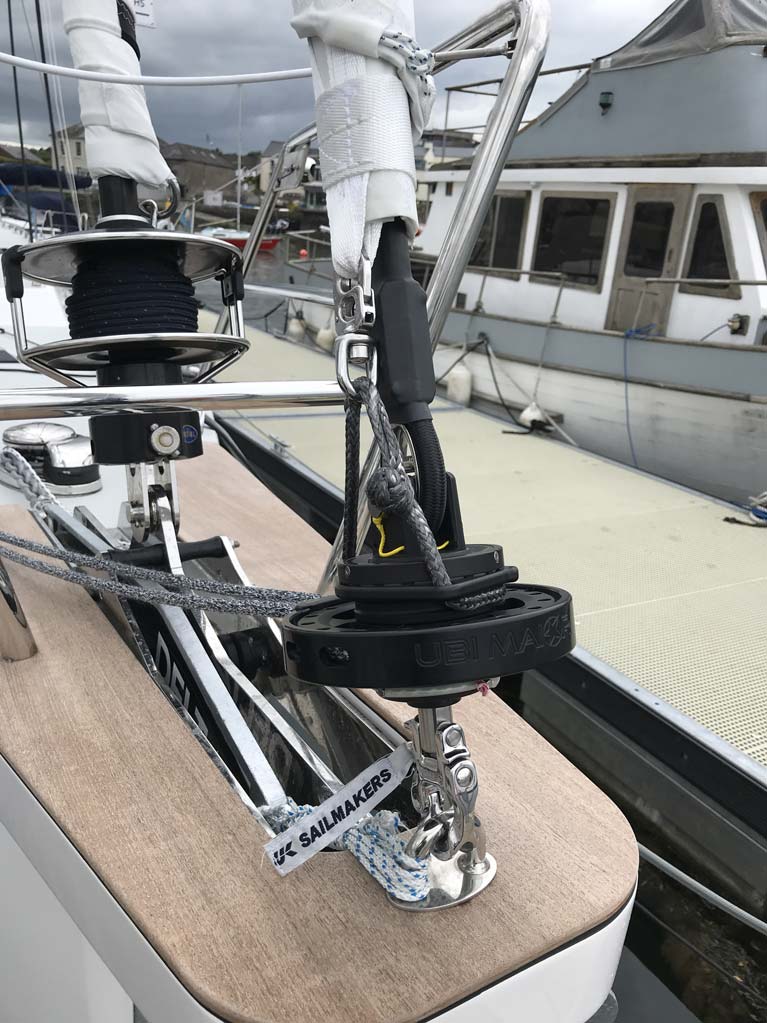 Ubi Maior FR125 RWM furler
The best value for money is the Ubi Maior furler. This furler comes with a ratchet lock and top-down option. The ratchet lock means you can stop the furler, open and close the furl at any point with the quick and easy ratchet trigger.
The cable has to be a torsion cable. Now there are lots of these on the market but only 10% of them do what they say on the box. Most are just ropes that are called torsion cables. If you turn the cable at the bottom, then the top should turn at the same time--this is an anti-torsion cable. We normally recommend Hampidhan Dynex Pro Furling cable, great value and it will do exactly what it says on the box.
Halyard Tension
This is a common question regarding Flying Jibs and Code Zeros. How much tension does the cable need to furl? With a proper cable then you can use it with low or high tension. If you’re using a rope cable then it needs to be bar tight for the system to work. For example, if it’s not tight then the cable can twist and tear the sail. With a Hampidhan Dynex Pro Furling cable, for example, you can have the halyard soft or hard and still furl the sail without any issue.
UK Sailmakers Ireland Covid-19 Measures
In light of the Government's safety guidelines, UK Sailmakers Ireland in Crosshaven has taken the decision to close the loft to customers, both for the safety of our staff and customers.
This has not affected the production or delivery of your new sails which will be available to you prior to the start of the sailing season.
During this extraordinary time, if you have sails for repair, please drop them into our sail bin at the loft, Royal Cork YC, DL Marina sail bin or Howth YC sail bin and please call us and we can then arrange collection.
If you need to pick up sails or have them delivered, please call us and we’ll arrange for them to be left in the sail bin at the loft or shipped to your local yacht club or marina sail bin.
Note - we are still operational - and we will update you if this changes.
Thank you for understanding.
Top Tips For the Bowman From UK Sailmakers Ireland
Barry Hayes from UK Sailmakers Ireland gives his top tips on how to be the best bowman
Any bowman worth his salt is fast on his feet, strong as an ox, and agile enough to climb the mast. The bowman is also the first to arrive at the boat and last to leave. Consider this about the bowman's role: there are very few changes or evolutions that happen during a race aft of the mast; they all happen forward in "bowman territory." The bowman must be prepared to deal with any call that's made from the afterguard and prepared to cope with any mishap that happens. Here are some top tips for a bowman spending the season on the pointy end.
 The bowman must be prepared to deal with any call that's made from the afterguard
1. Wear the right clothes
If you don't go out suited and booted then you're coming home wet. A smock/spray top with closures at the collar, wrists, and waist-worn over layers is the best option to you stay dry. It's light and you can fit into any area without wearing a big offshore jacket. Non-adjustable trousers are a must as are shoes that stick to the deck. (Never consider going barefoot!). Test the shoes well before buying. A soft rubber sole is best, and boots with gaiters are the best option for offshore. Most of all, have dry socks if you're wearing shoes or boots.
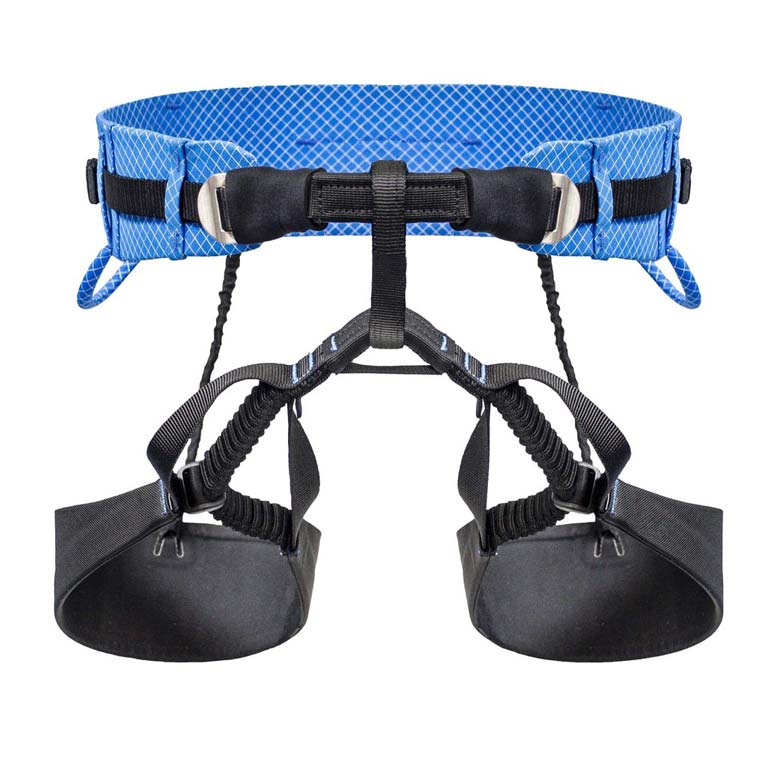 Spinlock harness
2. Must-have gear
The best harness in the business is a rock-climbing harness. Which you can get from Spinlock. These are light and simple to use. And excellent on the backs of your legs as they are wide. It's also vital to have hanging from your harness:
- A Leatherman skeletool
- An aluminium fid for spiking snap shackles
- soft shackles (different sizes)
- A roll of rigging tape
Going offshore, I prefer to wear a drysuit rather than traditional foul weather gear. I unzip it when I am below, and I'm always dry on deck. It's quick and straightforward and you can be on deck in seconds. A good quality suit means you can get out on the bow and now worry at all about being wet in any shape or form. They fit well with the latest life jackets.
3. Prep your boat
A good bowman will be first on the boat and last off, so he's ready for the next day's sailing. It's a bowman's job to check that all your luff tapes are stacked correctly and that the spinnakers are packed and prepared to go. Clean any furlers, check running rigging, and get it all prepped and ready before the rest of the crew arrives to a clear boat.
 It's a bowman's job to check that all your luff tapes are stacked correctly and that the spinnakers are packed and prepared to go
4. Before the start
Have a thorough conversation with the tactician and helm well before the guns start firing. Review your starting sequence hand signals. Discuss the course, work out what sails will be needed, when and why. Getting angles for these sails will also help in terms of stacking sails below and pre-setting leads on the deck. If you're going upwind then changing to a code zero and later on to an Asym it will dictate a particular bow choreography. And those steps are up to you to take as the bowman. Perhaps you have the code zero plugged into starboard, and the kite plugged into port before the race has even started; you've already discussed this with the afterguard. I always try and hoist my code zero to windward and get it set ready to go before the start drop it back down, available for the first mark.
5. The start
Your job is to work with the helm and tactician to get the boat into the best position possible (and not over the line) when the gun goes off. Getting a good start is 90% of the race. Having clear communication with the helm is critical. With clear eye contact (tell the crew on the rail to hike out), hand signals are crucial if you don't have a headset on which are very common on big boats these days. Finger pointing up for come up, pointing down for down, fist for hold, hand opening for ease, hand closing for tighten. You need to know your boat lengths; practice a few approaches and get your lay lines and line sights before the start.
 The least amount of time spent on a bow the better; keep your eyes open and focus on your job
6. Plan ahead
Before you rush to deal with something that comes up unexpectedly, think ahead about what needs to be done and be prepared. The least amount of time spent on a bow the better; keep your eyes open and focus on your job. Most pro bowmen spend less than 1.40 seconds on the bow in any windward-leeward race; aim for this target. Plan ahead, do quickly what needs to be done and get off the bow.
7. Always hold on
Nothing in this job is worth your life. It's great fun, but being clipped on with a good life jacket is worth everything. I use a carabiner with a short strop to my harness when I am working in heavy weather. I can quickly clip on and not worry about being washed away by a big wave.
8. Always look up
Whichever boat you're on, masthead or fractional, fast or classic, take time to learn which halyards are going where, make sure they are free to run. Make a drawing and determine which halyards do what with which sail like a 2:1 code zero halyard. If you cross a halyard in a change, then don't waste time uncrossing it; instead plan your next sail change so you can uncross it. I always leave the spinnakers halyards on a 2 ft strop higher up off the deck then the genoa halyards whereby they never get mixed up at night when you go to get one.
 Working with people without shouting is the objective
9. Communication is key to your job
Working with people without shouting is the objective. I always call the name of the person you want to address before you tell him or her what to do. If you say, Bob, (pause till he's looking at you) ease the tackline," is much more effective communication. Plus (theoretically) only Bob will leave the rail to ease the tackline and not half of the crew!
10. Understand how vital the pit person is to a bowman's success
There is a secret kept between the bow and the pit: they run the boat. The afterguard may point the boat in one direction or the other, but the manoeuvres don't work unless the bow and pit are working in concert. Having a very tight bond with your pit person is key to your role.
Remember, be prepared, anticipate, have your gear ready, stay in control of "your bow," and communicate effectively, no race is won without a bowman.
 Manoeuvres don't work unless the bow and pit are working in concert
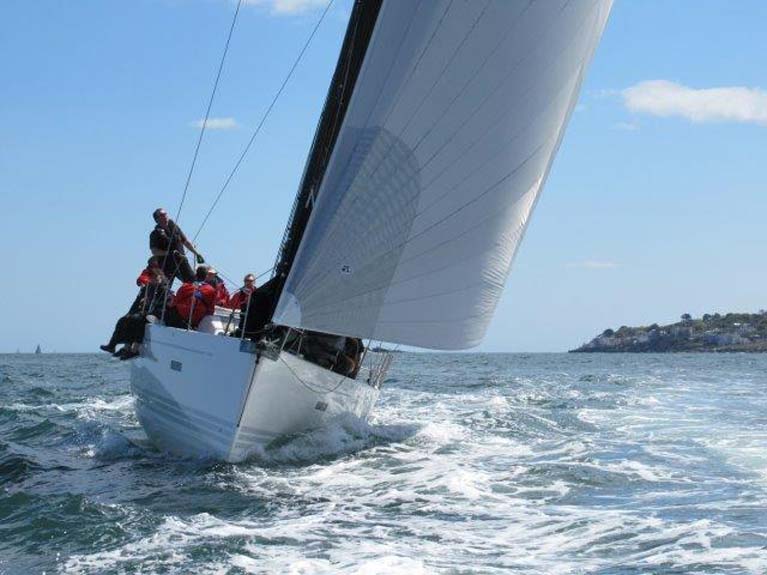
Top Ten Sail Trim Tips From UK Sailmakers Ireland
Barry Hayes from UK Sailmakers Ireland gives his top ten sail trim tips for the coming season
1. Know your sails, know your settings
Many boats sailing inshore with non-overlapping headsail setup regularly use up to three headsails. It is vital that you have go-to settings for each sail. I assign a colour to each sail, green for J1, blue for J2, red for J3. I then whip a mark on my jib car adjustment line in each colour, on both sides, so I have a good starting point for each sail. This is particularly helpful if you have been reaching and the car went forward, or if the wrong rope was uncleated at the windward mark, you have a quick reference point in the cockpit go to.
Pre-set markings also should be made on the jib halyard using a scale on the deck in front of the halyard clutch. Set each sail to good halyard tension (looking at the draft position of the sail) and mark the scale with the sail’s corresponding colour.
These will give you baselines to work from for each sail that you can tweak as conditions require and will allow anyone to step into the pit and easily set-up the baselines.
2. What is Twist?
Twist, in its raw form, is the difference in your sails “angle of incidence” when measured at points of increasing height up the sail’s leech. Twist is when the top of the sail opens compared to the lower sections. We increase twist in light winds and take out twist as the wind increases. This also has a lot to do with how the wind is performing at various heights. Friction from the water slows downwind on the lower portions of the sail relative to wind further aloft. The lower, relatively slower wind changes the angle of the different than higher sections, so we need to twist our sails to make sure they are trimmed correctly in up and down the entire sail. This is particularly important in lighter conditions where the wind angles up the sail vary more than in heavier conditions.
It is fundamental to understand that twist gives us the ability to control the lift and drag produced by our sails. As the wind speed increases and the surface friction has less of an effect on the wind angle, there ends up being less difference between the top and bottom of the sail. As such, less twist is needed to trim the sail correctly.
3. Watch those telltales…
.. but not the ones you may think. The headsail luff telltales are a great indication of where the sail is in terms of power and car position, but, when sailing upwind, the leech telltales are absolutely crucial as they show how close you are to max trim. Unlike the mainsail, where some stall is good, we want as little stall as possible on the leech of the jib; but we want to be right on the edge, as close to stalling as possible. Our leech telltales are the best indicator of this.
Generally, your top leech telltale will stall first. Trim the sheet until the top telltale starts to fall to leeward. It is being sucked into the leech by the air separating off the leeward side of the sail. Once you have this stall, ease the sheet a touch to get the telltale flowing 95% of the time with a 5% stall. This is a good indicator that the jib is fully trimmed for average conditions.
If the conditions allow it, stay to leeward and check this constantly. If the breeze drops, the sail will stall so ease the sheet. If a puff hits, the sail becomes under-trimmed and, always looking for that little bit of telltale stall, trim the sheet as necessary.
4. Ease your inhaulers during pre-start
If you have a boat with a non-overlapping jib trimmed through inhaulers, this tip is for you! When you are manoeuvring during the pre-start, make sure your inhaulers are fully eased. Inhaulers are a great tool for improved trim, but only when sailing fully upwind. When reaching or bearing away during pre-start, it is important to keep the boat at maximum power and speed (when needed). If you inhaulers are trimmed inboard, your jib will twist open when the sheet is eased, the inhauler will hold the clew inboard, leaving the bottom of the sail over trimmed and sacrificing power. Only trim the inhaulers to your marked upwind setting on your final approach to the line.
5. Keep an eye on the “big” sail
Mainsails on cruising and racing boats have evolved into much bigger sails. On racing boats, the main has grown because of rating advantages, while the mains on cruising boats have grown so that they can be sailed under main alone.
Luckily, methods for trimming the mainsail are virtually identical for all boats, fractional or masthead, racing or cruising. The cunningham, backstay, outhaul and running backstays are all used for the same purposes.
Upwind mainsail trim breaks down into three basic modes: Maximum Point, Cruising Speed, and Fast Forward (I’ll discuss Fast Forward in the following tip and the others in future articles). Cruising speed is used 90 per cent of the time when sailing upwind, while max point and fast forward modes are saved for particular tactical situations. For the following tips, I'm assuming the jib/genoa is trimmed properly.
Sailing upwind is the slowest point of sailing; therefore, small differences in heading and boat speed are significant. For racers, upwind sailing is critical because most races start with the first leg into the wind.
6. Fast Forward
I call the third setting for upwind sailing the Fast Forward mode. This mode is useful in several tactical situations such as when you have over-stood the weather mark, or when you are trying to reach over the top of the fleet in anticipation of the next header. Another condition is if you have come off the starting line and have just a slight advantage over the boats leeward of you and you want to foot down over the top of another boat causing it to tack.
As in all settings, the jib should be set properly for beating with, perhaps its outside telltales lifting slightly applying more pressure on the genoa and generating a few extra tenths of boat speed.
Set the mainsail with the maximum depth it can carry without excessive heel and without stalling the leech. Do this with the cunningham and outhaul while keeping the boom on centreline and ease the main sheet and the vang slightly allowing the boom to lift and twist off the top two battens. If your boat has them, ease the runners to twist the main slightly. Your speed will continue to rise.
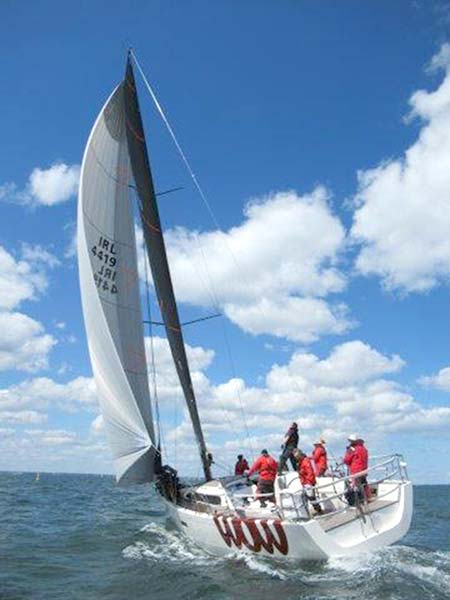
7. Trim
“If in doubt – ease it out” There is nothing slower than an over trimmed spinnaker. Always ease the sheet so the luff of the sail is showing a slight curl. If the curl becomes too big and is threatening to collapse the spinnaker, trim in to stabilise the sail.
This is the foundation of good spinnaker trim. A slight curl means the sail is producing max power with minimal stall. From there, your sheet should be trimmed in and out a few inches constantly. The spinnaker trimmer has no time to look around and take in the sights downwind, it is a constant job. Always be checking if you are at the point of curl. If the sheet isn’t moving then the spinnaker isn’t being trimmed. Small subtle adjustments to keep you at top speed.
8. Symmetrical Spinnaker Fore & Aft Trim
Once your sheet is eased and spinnaker showing signs of curling, we can now look at our fore/aft spinnaker pole trim. This is adjusted using the guy and foreguy.
The objective is to make the vertical mid seam of your spinnaker parallel to the mast, i.e. vertical. When this seam is vertical your fore/aft pole trim is correct.
If the mid seam is angled to windward, trim your pole aft which will make the seam vertical again.
If the centre seam is angled towards the mast , ease the pole forward until the seam is vertical once again.
The guy should be trimmed about half as much as the sheet with the foreguy adjusted accordingly. The guy trimmer should listen to the sheet trimmer and always work together as too much “unauthorized” pole adjustment will confuse your sheet trimmer.
9. Pole Height
Optimum pole height is determined by where your spinnaker curl begins. Easing the spinnaker sheet should create a curl at the mid-section of the luff that will then spread evenly up and down from this point.
If the curl begins above the middle section (towards the head) then the outboard end of your pole is too low. If the curl begins lower than the middle section (towards the clew) then the pole end is too high. Adjust inboard and outboard pole hight until the curl starts at the middle section.
10. Forces Sailing Downwind
As the breeze freshens, it’s important to understand the forces being generated by your downwind sails – the mainsail force and spinnaker force combine and determine where the boat is going. The goal is to have these combined forces align with your course.
We have all experienced the unsettling rolling motion when sailing downwind in breeze – in extreme cases, this can result in a broach gybe. This rolling is caused by pole being too far aft. The spinnaker force overpowers the mainsail force – causing the spinnaker to pull the boat to windward. Ease the pole forward which realigns the spinnaker force and brings the boat back into balance.
UK Sailmakers Upcoming Talks at Kinsale Yacht Club and Foynes Ahead of Busy Season
Busy UK Sailmakers Ireland loft in Cork Harbour is preparing for another hectic season afloat while Loft manager Barry Hayes is also out and about meeting sailors on all four coasts of Ireland.
Last Thursday night, Hayes led a talk at the National Yacht Club in Dun Laoghaire that featured a great turn out of members and non-members alike for the hour-long presentation.
This week, UK Sailmakers will give a talk at Kinsale Yacht Club on Thursday, Feb 13th at 7.30 pm. All are welcome. Hayes will talk on top sailing tips while colleague Harry Lewis - well known for his rigging work and expertise in Harken deck gear - will demonstrate winch servicing.
The next talk is in Foynes YC on the Shannon Estuary on the 26th of Feb at 7.30 pm. Again, all are welcome.
Below sailmakers at the loft prepare a gennaker for furling.
Following on from the success of talks at Royal Cork Yacht Club, Howth Yacht Club and last night's Royal St George Yacht Club event at Dun Laoghaire Harbour, Barry Hayes of UK Sailmakers will give more sailing tips plus a demonstration on how to service Harken deck gear at the National Yacht Club on February 6th.
The NYC talk is open to the public and it's free to attend. Sign up to at this link here
Hayes moves south to Kinsale Yacht Club for a talk on February 13th and heads west to the Shannon Estuary on February 30th for an evening at Foynes Yacht Club.
Upcoming talks
National Yacht Club
6th of Feb at 7.30 pm. With Barry Hayes
Kinsale Yacht club
With Barry Hayes and Harry Lewis
13th of Feb at 7.30 pm.
Foynes Yacht Club
With Barry Hayes
26th of Feb at 7.30 pm.
A Look at Sail Design With UK Sailmakers Ireland
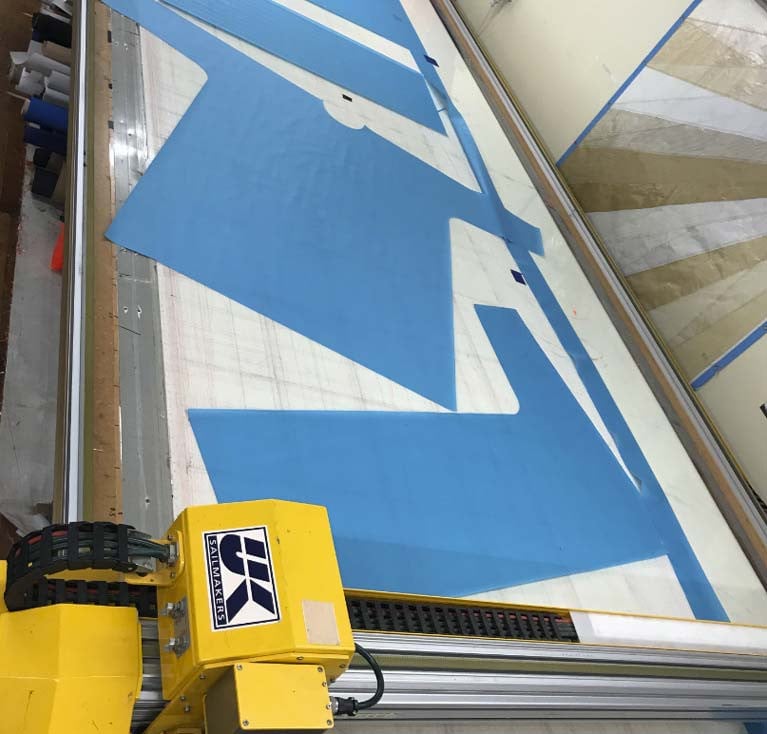
The art of sail design has come a long way since the days of hand-dawn files and even rudimentary CAD design programmes. Today, UK Sailmakers Ireland uses SAILPACK which, in our opinion, is the best sail design program on the market. SAILPACK has 3-D design tools that allow a designer to create complex arrays of computerised fluid dynamic patterns that articulate both acronymic flow and load paths.
With SAILPACK, the designer first creates a 3D model of your boat replicating the rig, deck layout, etc. that the sail will ultimately have to interface with. From there, they can then design the sails to perfectly match your boat dimensions, sheeting angles, and sailing conditions. This is the best way to design the sails for any boat because it allows you to see the overall picture of how the sails work together and how they fit the boat. You also get to confirm how the sails fit around the spreaders and shrouds (very important details); you can also set the clew height and sheeting angles.
Next time you’re at your sail loft, ask your sail designer to show you these design files so you can see that you’re getting the very best sails for your boat.
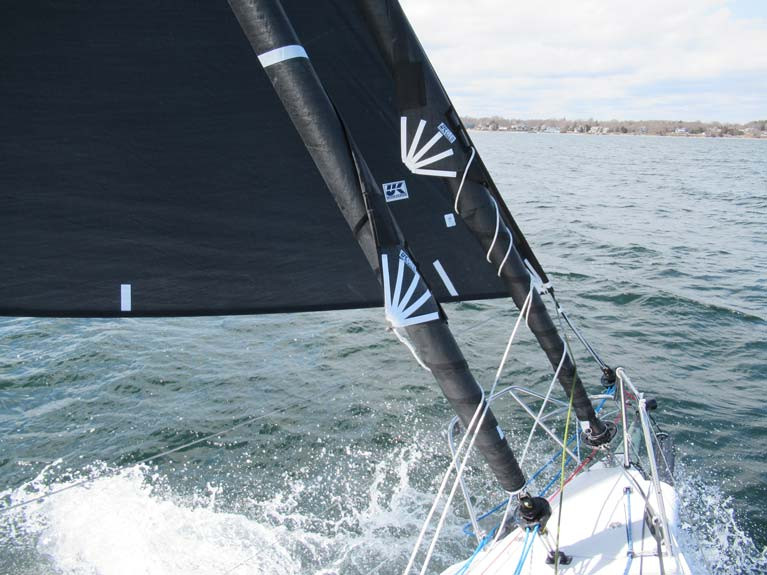
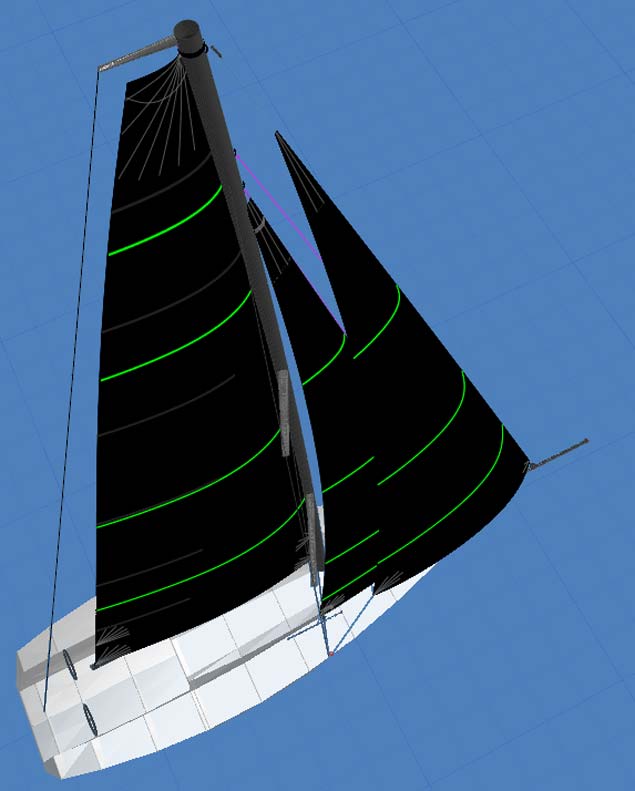 Flying Jib top view
How we design the sails
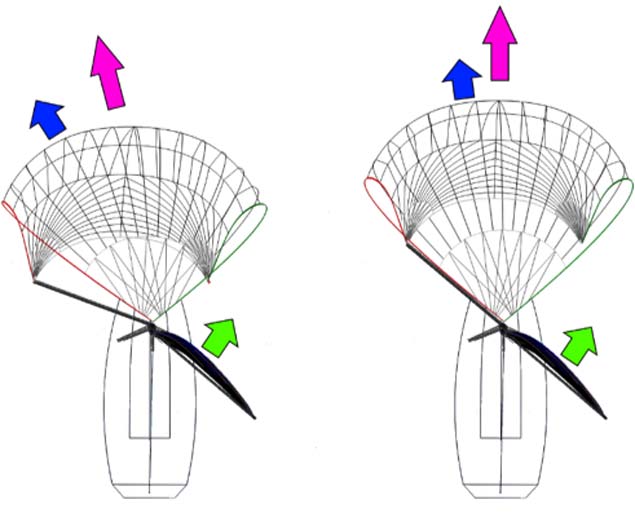
When designing sails, the designer looks at the “balance” of the boat and the best way to make the boat drive forward with the least amount of drag. This balance between the keel, rudder, hull and sails is called the “lead.”
When we design the sails, we look carefully at the lead to optimise the driving force between the sails and the boat. For example, adding extra roach to a mainsail will add pressure at the back of the boat, changing the lead and thus causing drag. This extra roach may only add 1% more power but add 3 % more weather helm which is undesirable. To balance this, the designer can add more headsail area as well resulting in a more balanced feel on the rudder. This balance between the main, jib, keel and rudder is critical to the boat working correctly, and that’s why we will never just independently design a mainsail or jib without looking at the overall picture of the boat.
An example of this can be seen in the J 121 design file below. You’ll note that the Flying Jib is set at the middle of the pole. This is to help balance the boat upwind and on a reach. It pushes the bow down more, and you're able to sheet on the mainsail more to provide more power and drive to the boat upwind and reaching. Having the tack out on the very tip would create considerable lee helm on the boat, and this will affect how the boat sails upwind.
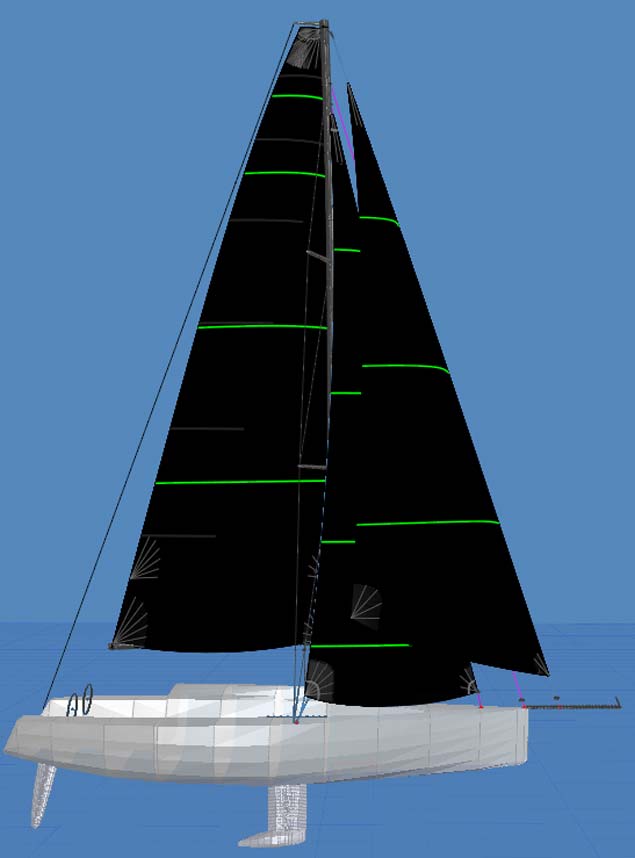 Flying Jib side view
There are some basic design moulds we work from: one design, Cruising, club racing, racing and high-performance racing. Each of these basic moulds will have different parameters and set up, like twist, depth and camber position.
For example, most mainsails are designed to have their maximum camber between 38% and 46% back from the luff. Rarely will the designer design the main outside of these values. You can tweak this parameter to move the centre of effort forward, but you have to ensure that you do not close the slot between the main and the jib. Closing the slot will change the airflow across the sails and will slow the boat down.
How the design tools work
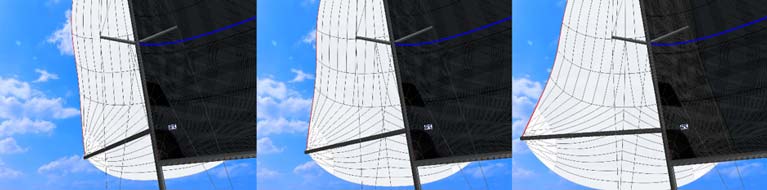
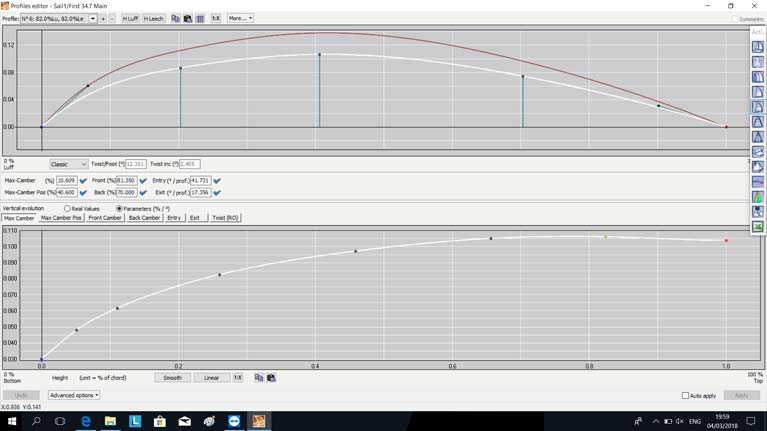
Lift and drag are the two basic factors considered when designing a sail – and the concept is very similar to designing a wing of an aeroplane. In the design editor file below, you can see the tools we have to change the shape of the sail where the designer can adjust the vertical camber bottom profile or horizontal camber top profile of the sail to suit the particular boat and its sailing conditions.
In the top view, you can see the overall shape of the sail at each section. This is “section 82%” or the top of the sail at the yellow dot. In the bottom view, you see the parameters are in the per cent value and not the real value. The designer can move any of the icons with the mouse (the black dots on the screen) up or down to give your sail its optimal shape.
Two highly productive tools are the green line at the luff and the leech. By moving these, the designer can adjust the sail’s entry and exit angles, providing a smooth aerodynamic flow. This is a fantastic tool to get the shape of the sail correct.
The relationship between how the mast bend and the slot working together needs to be understood when designing the sail. For example, upwind sailing, with the backstay full on you will design the luff curve to allow the sail to flatten, but not over flatten the sail, so that the sail retains just enough shape to provide power and driving force without closing the slot which causes drag. When sailing downwind, with the backstay off, the static bend will allow the sail to deliver its maximum power to drive the boat forward.
It should be noted that bot mainsails and jibs have become a lot flatter and use tighter sheeting angles over the years due to the invention of moulded sails technology and having stiffer fabric available.
Headsail Design
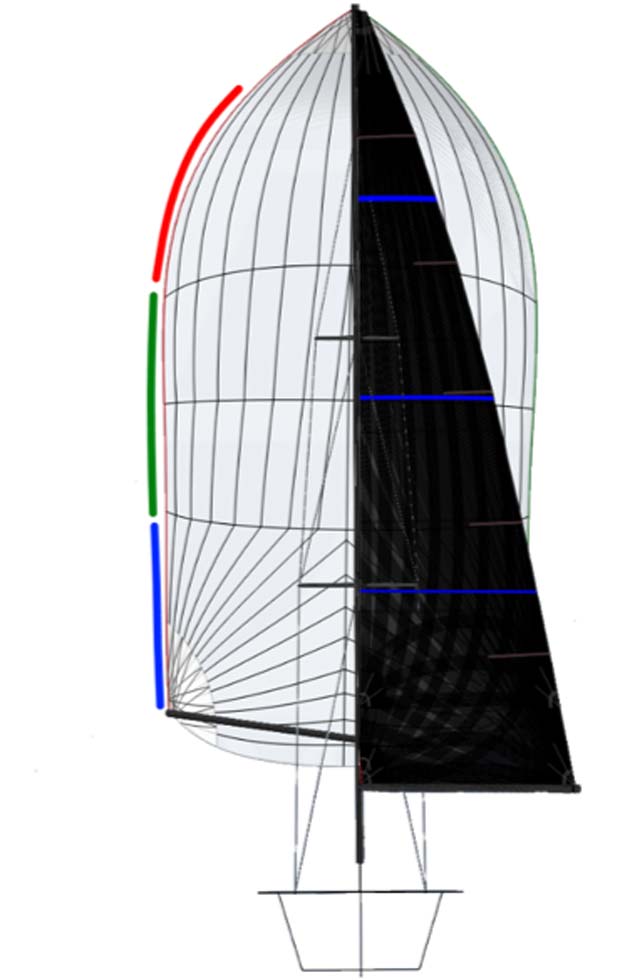
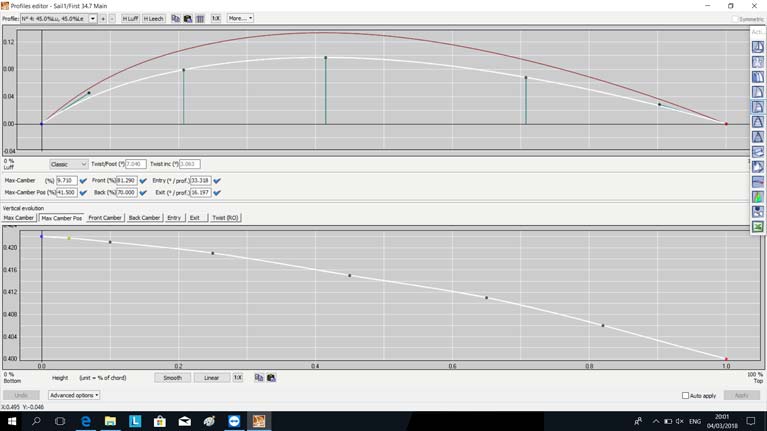
Headsail design has come a long way and, as noted, non-overlapping jibs are a lot flatter in the leech with more twist (between 60% and 80% of the leech). They have also gone very deep and knuckled, creating a better attack entry angle which both balances the boat and creates a better flow over the headsail. Overlapping genoas haven’t changed much other than their camber shape which has become a lot smoother with a straighter exit. Having 3-D design tools allows the designer to marry the leech to the rig which you can see in the design file below. As you can see in the following image, the leech is very close the spreaders and shrouds, allowing the max headsail area and balance between the sails.
Asym Spinnakers
Thanks to design advancements over recent years, asymmetrical spinnakers have become more user-friendly and easier to trim. We now set the clews higher, which helps with the leech twist while improving sheeting angles. Asyms have evolved from reaching sails to tack-up running sails; now we have sails that work for both reaching and running making shifting gears easier. Designs have also added a bungee retractor system into the sails which replace the need to band the sail...helping the environment. The system retracts back into the luff and the foot when the sail is hoisted, so the system is fully reusable every time.
The most interesting recent development in Asym design, however, is the new cruising top-down furling Gennaker. This easy-to-use / easy-to-furl sail has a cable in the luff and will never get a twist in it. This new type of sail has transformed cruising and offshore racing.
 Top-Down cruising gennaker
The top-down furling Asym is a big development for sailors who push their boat hard offshore or just cruise a lot. Cruisers can leave the sail up overnight, and furl and unfurl when needed. Racers find it’s a great sail to push hard and with the option of just furling the sail when you wipe out.
A new twist in sail design
The twist is an important factor now in sail design and sailing. With stiffer sails now being used, we are putting twist back into the leech of sails, so they open up (depower) quickly and get the laminar flow working again. Getting the airflow to stick to the back of your sail is vital. A handy tip is to put your hand on the leech/clew area of the sail and feel if the airflow is sticking to the sail.
Modern sails have transformed sailmaking and how the sails work. An example is the use of uni-carbon sails which are stiffer and last longer. These sails are structurally designed to disperse aerodynamic loads from head to the clew. They also use uni-carbon to carry the load from luff to leech allowing the sail to hold its shape better.
There continues to be an evolution in the art of sailmaking, and the developments discussed in this article are just the tip of the iceberg. The key, however, is to remember that albeit sail design now is largely computerised, it is the experience, insight, and imagination of the designer that ultimately creates a fast, well-built and durable sail. Speak to your sail designer and see for yourself.
See for your self in real-time
To use SAILPACK viewer, please download this link here then sign up for it. And once you get the key code, then you can view the design file attached (in the yellow panel below). It’s a 3D Design view of a J121 Flying Jib PPK. Which you can see in real-time. This will give you an idea of sail shape and sail design in real-time. Including the hull, keel, rudder, sails. From this, you can see the relationship between all of the items we talked about and how they work as a team together.
The Lead in Sailmaking: What Is It & Why Is It So Important?
Determining just how much lead is required depends on what type of yacht you have. Here, Barry Hayes from UK Sailmakers Ireland explains what lead is and why it is so important to sailmaking.
In sailmaking terms, the ‘Lead’ is the distance between the sail plan’s Centre of Effort (usually the working sail area which is the main and fore triangle “CE”) and the Centre of Lateral Plane of the hull/foils (CLP). Both the CE and CLP are approximate positions for the centres of pressure for the sail area and the hull underbody, respectively, and are used by yacht designers at the drafting stages to ensure that the keel and rig positions are well balanced. CE is always forward of CLP by a small amount when in equilibrium mode. This is because when the yacht heels, the CLP usually moves forward due to the new heeled hull form until it lies almost under the CE. The result: helm balance.
There is an amount of Lead (pronounced “leed” as opposed to “led”) that is acceptable, but if the design falls outside this area, the boat will have either too much weather helm (‘Lead’ is too short) or too much lee helm (‘Lead’ is too long). Too much weather helm results in drag (and in some cases helm exhaustion) and too much lee helm can result in dangerous situations such as crash gybes or worse, particularly if self-steering or helm issues come into play.
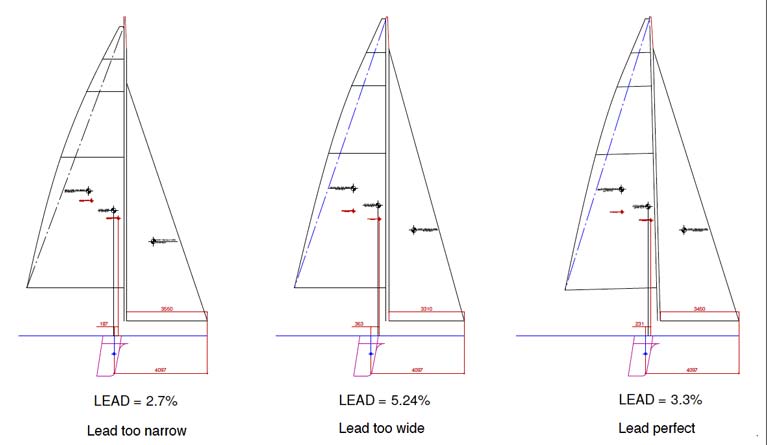
Determining just how much Lead is required depends on what type of yacht you have. There is a rule of thumb that compares the Lead to the static waterline length. You divide the Lead by the waterline length and the result is ‘Percent of Lead.’ Depending on the methods you are using to work out CLP, the allowable percentage can vary from 4% up to 17% after incorporating a number of factors. Hull shape is a key factor affecting Lead. A wide hull with hard bilges will require more Lead in static mode to compensate for the additional helm generated by the heeled hull shape. A narrow hull needs less Lead. Similarly, a tall rig creates more weather helm than a shorter one so the POL needs adjusting accordingly.
A yacht designer would adjust the lead by either moving the keel fore or aft or moving the CE of the sail plan fore/aft. they would get it perfect on paper (or CAD) so that, when launched, they will know that the boat will be well balanced with no vices from the outset. Interestingly, the reason they look at moving keel first is that this would require a very small change to affect Lead as opposed to moving the rig and resulting sail plan which would require bigger changes to have the same affect. When building a new boat from scratch. Its always best to get extra holes in the keel box so the lead can be easily adjusted.
 First 50 Mermaid - well-balanced lead with non-overlapping headsails
If you have a pre-owned yacht that is not well balanced and want to make changes, then the Lead can be corrected simply by adjusting the sail plan, mast rake, sail configuration or set up. Of course, you can also incur the expense of moving the keel, but this is a major refit and should only be looked at once you have looked through all other options above the waterline.
Windsurfers are a good example of how Lead works above the waterline. If you want weather helm, or to go to weather, you tilt mast aft till it is in that upwind groove and going well. When you want to fall off, you tilt the mast forward, thus moving the CE forward until you find yourself going downwind, and again within that sweet groove. Too much tilt aft she tacks; too much forward she gybes. It’s a matter of finding that balance between the direction you are going in relation to the wind.
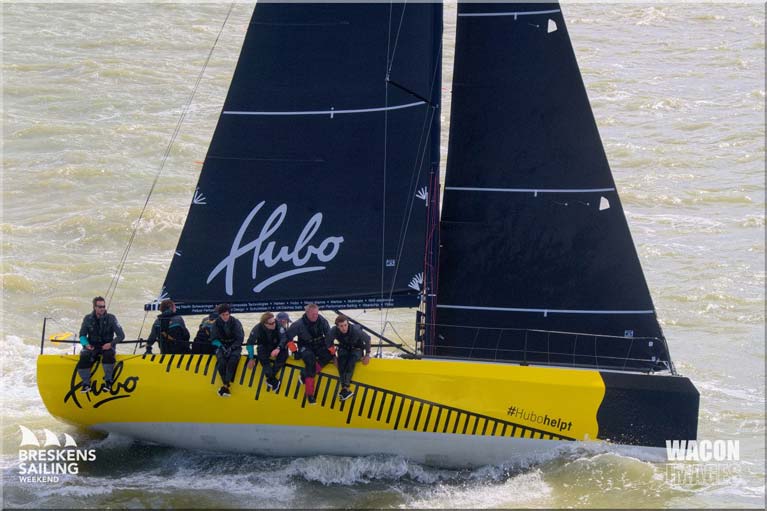 Waarschip 36 Hubo upwind - well-balanced lead
Of course, in most yachts with rudders, the direction the boat will travel is done through steering. If the balance is off, the rudder ends up fighting it and the result is increased drag affecting performance and the loading up of everything attached to the steering such as autopilot and sheaves. How can you change Lead while sailing? You can start by adjusting the shape of the mainsail with halyard or outhaul tension or mast bend. A reef in the main also moves the CE forward thus reducing weather helm. Putting a smaller headsail on will also move CE forward thus reducing helm. Though a reduced main makes a bigger change than does a reduced headsail. It’s all about finding that balance between the two.
If you need your boat assessed or looked at. To get the balance right for you. Then get as much information as possible about the problem and give us a call at UK Sailmakers Ireland. We are happy to help your performance.


, celebrate victory in the opening round of the 2024 UK Cape 31 Class Race Circuit at the Royal Southern Yacht Club")


 Michael Murphy Schull Harbour Sailing Club (SHSC), Eric Coogan Heineken Ireland, Mark Murphy, Commodore SHSC, Jack Allen SHSC, Carmel O'Regan SHSC, Cornelious Ndlovu, Schull Harbour Hotel Operations Manager and Derval Murphy SHSC")

