


Displaying items by tag: UK Sailmakers Ireland
Cruising Sails – What's New for 2019?
With Winter setting in and the Turkey Shoot over, it is just about time to begin making plans for the 2019 cruising season. In this article Barry Hayes of UK Sailmakers Ireland provides some tips and options to make your cruising faster, safer, and more enjoyable experience – without breaking the bank.
Making sailing easy
Properly-shaped sails make cruising easy, since your boat will heel less when the breeze is up. Less heeling makes sailing more enjoyable and more relaxing for the less experienced crew members. One way to reduce heeling is to set your sails correctly for the weather you have. Tucking a reef in before the weather comes in helps build crew confidence and experience. No one cares when you will get where you're going as long as you get there comfortable.
Gennakers with Stashers
Cruising with a gennaker is often viewed as a complicated affair, especially when sailing shorthanded. However, adding a stasher to your current gennaker is an easy option – and they are simple to use! They take the complication out of flying your spinnaker while shorthanded.
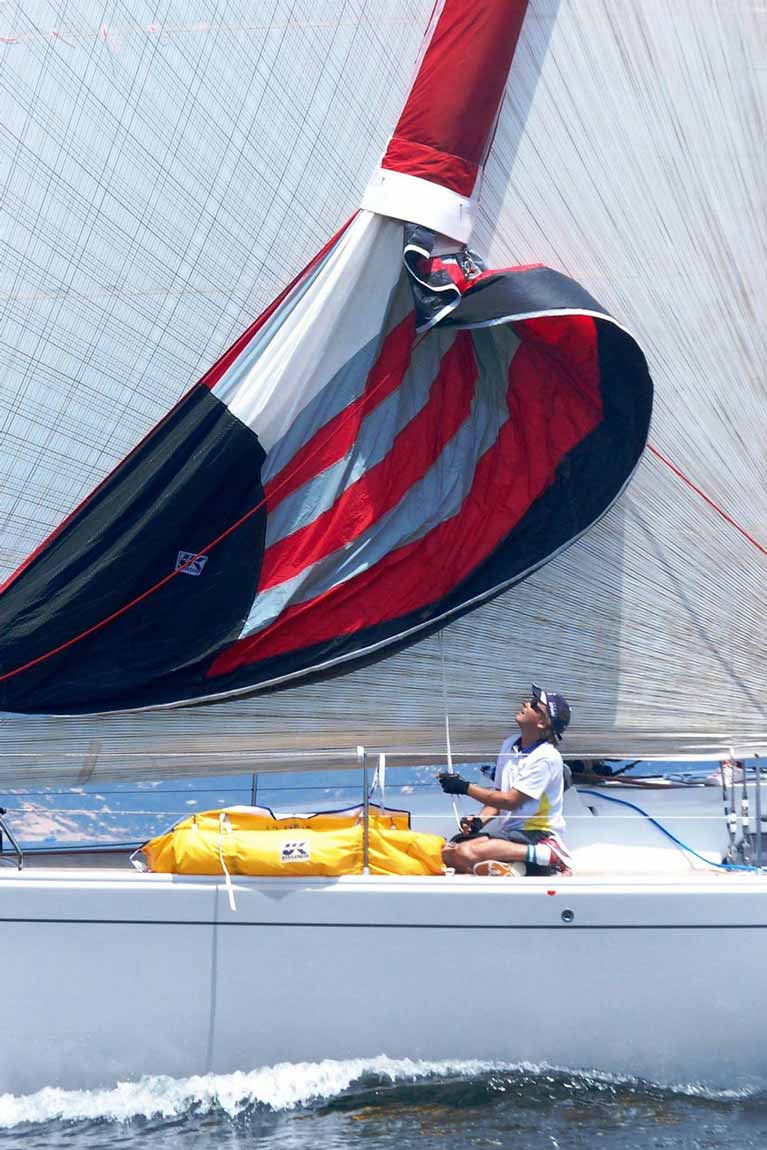
A stasher is, in essence, a “sock” containing your spinnaker. After hoisting the sail in the sock simply pull the stasher to the top of the mast using the pulley system and tie it off. To douse the spinnaker simply ease the sheet and pull the stasher back down, dousing the spinnaker inside the sock. Stashers are light, reliable, simple to use even when single-handed, and can be retrofitted to any spinnaker – stashers are an inexpensive way of getting more use out of your cruising gennaker.
Note it is best to have a stasher without a hard fibreglass end – these are heavy and may scratch the inside of the boat - a soft neck stasher is best.
A stasher is also an excellent add-on for club racing using the lightweight version. It makes getting around the cans that much easier. Read more in the UK Sailmakers' Tips to Setting Up & Handing the Cruising Spinnaker in the pdf downloadable below.
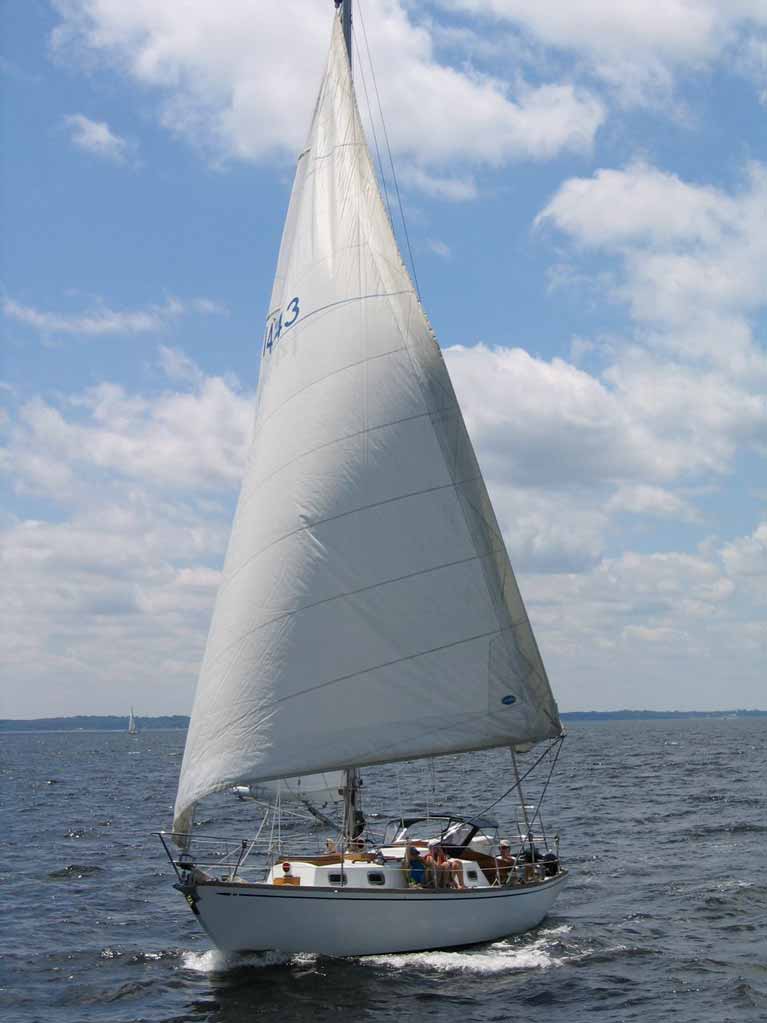
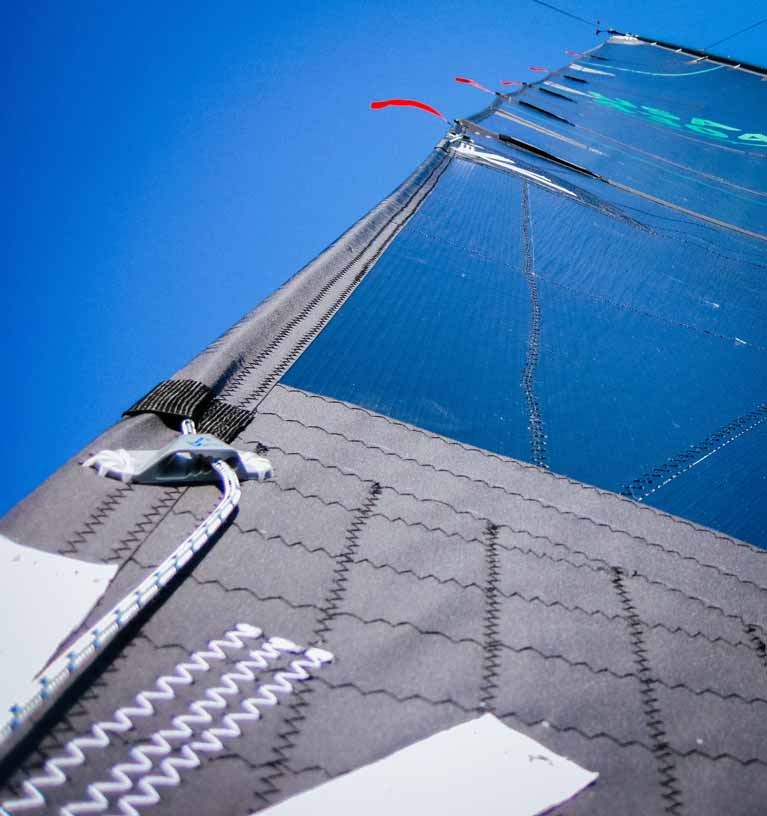
Furling Gennakers
A furling gennaker is a considerable upgrade over a stasher. Furling gennakers have evolved considerably over the past half decade – there are now furling gennakers with a cable in the luff of the sail, allowing the sail to furl like a furling genoa.
See the photos below as an example.
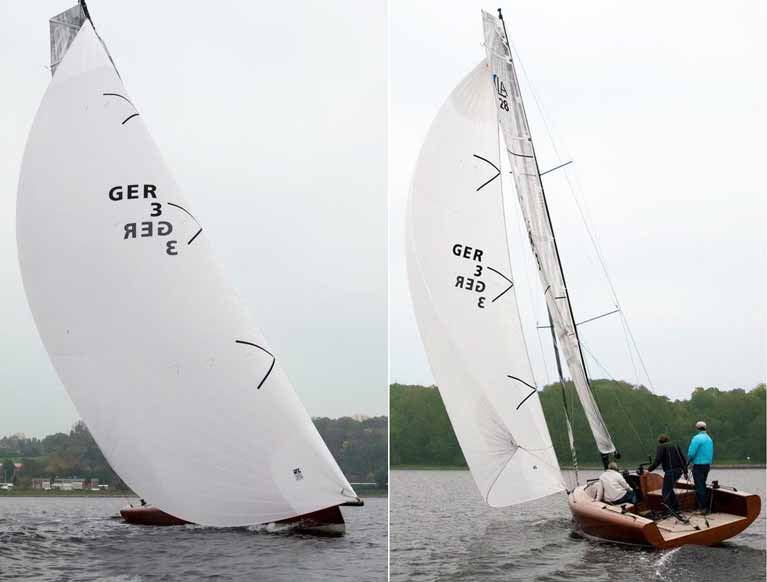
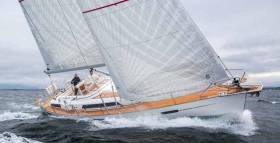
The Code D easy furl gennaker is the latest evolution in cruising gennaker design. The sail is quick and simple to furl, straight from the cockpit, and can be left hoisted until safely docked. Having this sail as a ‘top down’ furling option is even better - top down furling produces a tighter furl with no risk of unplanned openings – life couldn’t be easier.
Stashers and Furling Gennakers have completely transformed cruising for many sailors. Long gone are the days of dropping your gennaker in the water and fighting to recover them. Stashes and Furlers make launch and recovery safe, quick, and simple.
In Mast Furling Mainsail - Battens
Furling mainsails with battens can be a curse if not handled correctly. Sails with full-length battens can often jam inside the mast. It is easy to shorten these battens to prevent them jamming. Having firm halyard tension keep the luff and sail in shape when furling. It also helps to keep a little tension on the outhaul to ensure a compact furl. most new in-mast furling mainsails come with a Thimble in the clew. As they are friction free and never brake. They are also a lot lighter.
Lazy Cradles
A good lazy cradle is absolutely invaluable for cruising - they are the best thing on the market. Now that winter is settling in it is a great time to ensure there are small reinforced holes to allow your cover to drain properly, and to add straps so the bag can be rolled away and stowed on the boom when sailing. (Link) the lazy cradle is an excellent way to make sailing easy. While having the roll away option keeps a clean aerodynamic flow over your mainsail,
Genoa – Outboard Lead
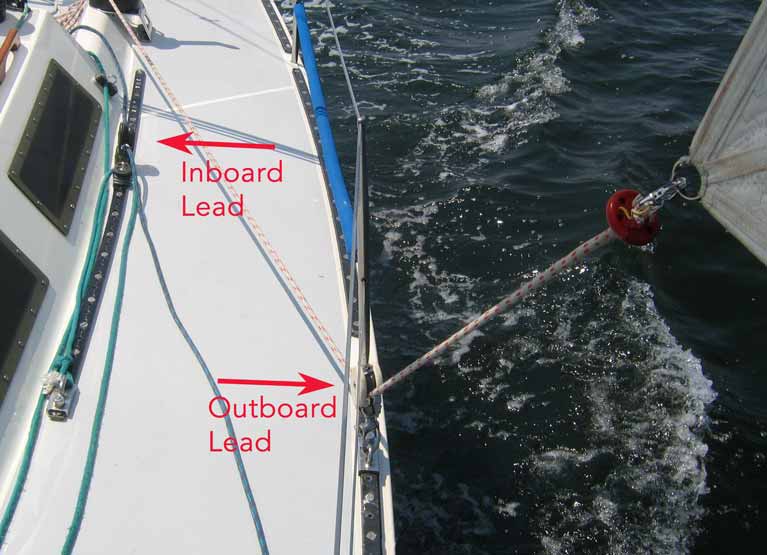
When broad reaching with your genoa it is best to move the car forward to ensure the sail does not over twist – even better is to set the sail on an outboard lead. This will result in a notable increase in boat speed while also unloading the helm – making the boat much easier to keep on course.
To determine where to place the outboard lead pad eye simply imagine a line from the middle of the genoa luff through the clew (when the sail is eased for broad reaching) and on to the deck – this is the point where the outboard lead needs to be set from. If in doubt – set it a little further forward. This keeps the sheet load on the leech and creates a twist profile to match an eased mainsail.
Wing on Wing Sailing
This is fun and easy way to cruise with the wind behind you. For boats with non-overlapping headsails sailing wing-on-wing can be done without a whisker pole. Just move to attach a block to the rail forward of the shrouds and run the sheet through it.
This will hold the clew of the jib outside the lifelines and give you enough leech tension to keep the top of the sail flying Having the clew “locked” outside the lifelines also makes it safer for your crew to move around the deck without the clew flop across and hitting them. On boats with overlapping genoas, you can not sail wing-on-wing without setting a whisker pole.
To protect your crew from the boom gybing accidentally, rig a preventer to the boom that will hold it out and protect you from a flying gybe. To make setting a preventer easier, make sure to have it rigged all the time. The best set up is to have a piece of line attached to the end of the boom that is long enough to reach the boom vang bail on the boom. This line should end with an eye-splice. When not in use, the preventer runs along the bottom of the boom and tied off to the boom vang bail. When you want to set it, shackle a line to the eye splice that is long enough to go to a block on the rail just aft of the bow pulpit and then runs aft to a winch.
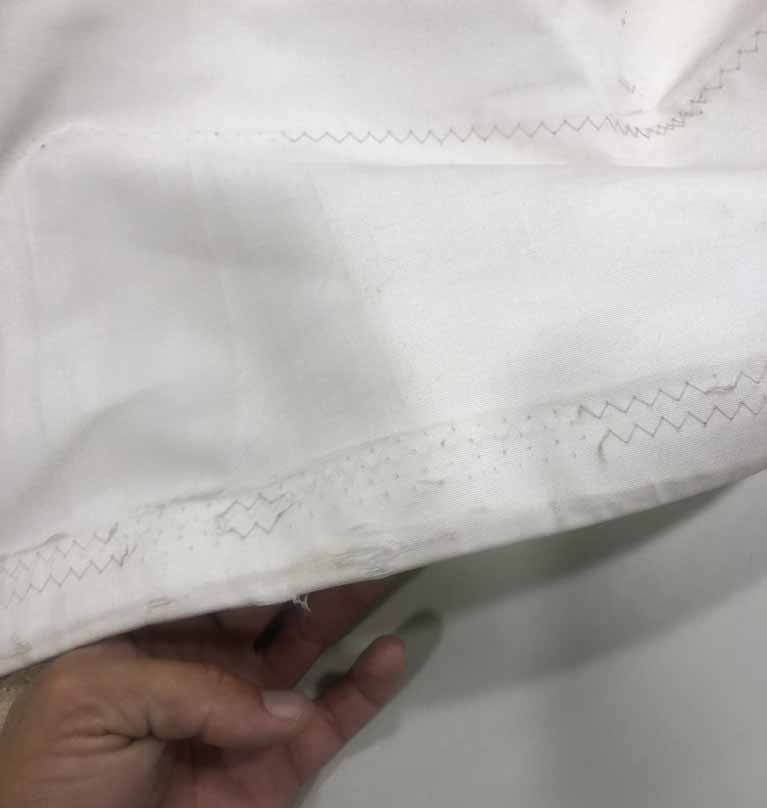
UV Strips & Maintenance
The biggest killer of sails is UV ray damage. It breaks down the fibres or materials used in your sails making them fragile and easy to tear. Having a well-maintained UV strip on the leech and foot of your roller furling genoa is essential to ensure a long lasting sail.
Over time the stitching on the UV strip breaks down, as does the canvas fabric itself. UV strips are sacrificial. There is no stopping UV rays – it is best the replaceable canvas UV strip takes the brunt of the damage rather than your precious sail!
It is also important to check common wear points such as spreader patches, stanchion patches, and where the sail contact the radar dome/deck light if fitted.
Leech Line Cleats
Ensure your main and genoa have good leech line cleats. As the old saying goes – “a flappy sail is not a happy sail” – leech flutter breaks down sail fabric over time. It is very easy to avoid by having your leech lines correctly tensioned.
Winter Service
Annual servicing of your sails is essential to getting off on the right foot for the coming season. Checking over, drying, and correctly storing your sails will go a long way to ensuring you are ready to go sailing on the first nice day of spring.
Please be careful when using cleaning agents on the sail. As they may burn the sail fabric. Only use recommended cleaning products. Always add your spreader and station patches on the sail so they protect the base layer fabric.
'Outrajeous' New J109 Arrives into Dublin
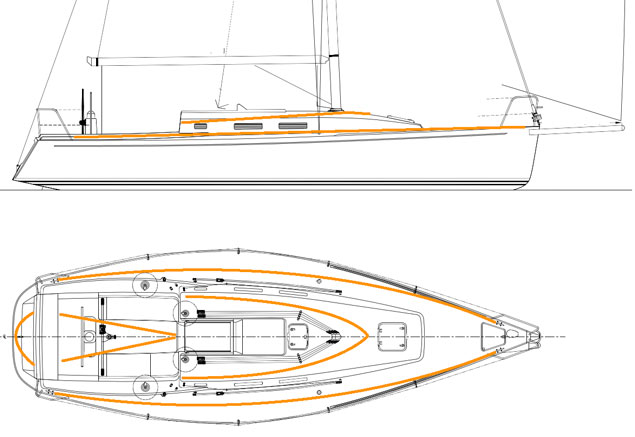
Continuing their 2018 development programme UK Sailmakers Ireland are working with John Murphy and Richard Colwell’s new J109 which arrived into Howth last month.
After successful development and testing of the ‘JX’ headsail design on Dublin Bay the UK Sailmakers Ireland team have shifted focus on to improving the class mainsail design – using data gathered from the ‘JX’ development programme.
“This is the next logical step” - explains UK Sailmakers Ireland’s Graham Curran – “it is all about percentage gain now. The class has reached a level where the big gains of crew work and boat preparation are gone. The skill level in the class is high – you have to chase the percentage gain – you can’t sit and wait for it to come, because it won’t.”
Mark Mansfield continues – “For years turning the corners effectively and going the right way resulted in race wins – now it is not so easy. To beat the guy to leeward you need to be faster, to hold that tight lane of the start line you need to have an edge. Small advantages are more crucial than ever in the J109 class – we’re not looking to be fast, we plan to be faster.”
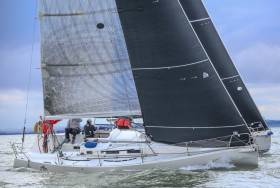
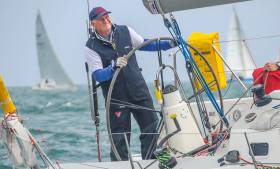
 The UK Sailmakers Ireland team aboard Brian Jones’ “Jelly Baby” in Cork Harbour on the second day of testing
Mark Mansfield has been heavily involved in the development process and testing – as a multiple National and J109 Class Champion aboard John Maybury’s “Joker II” Mark is arguably one of the most knowledgeable J109 sailors in the country. His input and experience with the J109 has been essential in moving the project forward and, despite his busy sailing schedule (Mark is racing Etchells in Miami this week) his enthusiasm and drive are unwavering.
“You can always be better, faster, and smarter“ - says Barry Hayes, head of development at UK Sailmakers Ireland – “we’re not doing this development work to match the status quo, we’re going to break and exceed it.
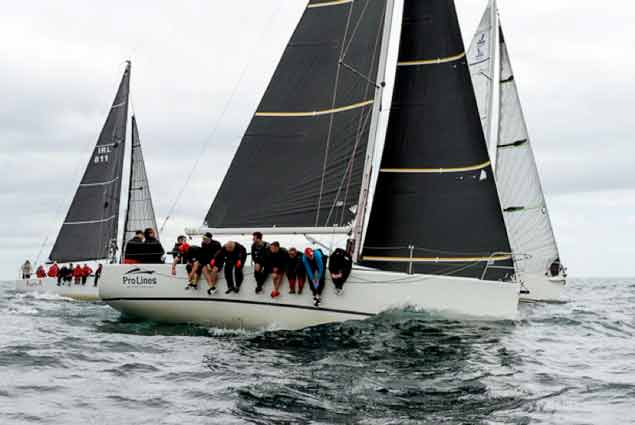
“Our customers are already at the forefront. John and Brian Hall’s “Something Else” are regulars at the top both at home in DBSC and abroad, pushing “Storm” all the way to the last race at this year’s Scottish Series.
Simon Knowles and Colm Buckley’s “Indian” showed impressive pace during the HYC Autumn Series, and the charted “JEDI” finished third in the competitive Beaufort Cup during Cork Week – with our continuing development programme we’re taking the next step in performance. Fast simply isn’t good enough, we plan to be faster.”
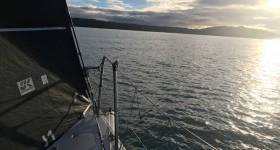
The sail development process will continue both on and off the water into early 2019 – after which Outrajeous will feature the newest developments in the J109 class in her 2019 sail wardrobe.
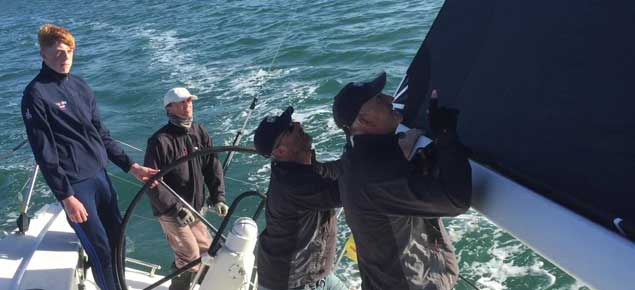
 Post testing aboard "Outrajeous" off Howth. Left to right: Mark Mansfield, Graham Curran, Barry Hayes
Murphy and Colwell have an extensive 2019 schedule planned for “Outrajeous” – including the ICRA National Championships on Dublin Bay, Sovereigns Cup, and Dun Laoghaire Regatta. The pair achieved considerable success nationally with previous campaigns - notably several National Championships with their Corby 25 “Kinetic” and later Richard with “Fusion”. Now once again as a combined team, with a talented crew pool and Mark Mansfield serving as tactician for some major events, they will be a boat to watch during the 2019 season.
UK Sailmakers J109 Class 'Fluid Structure Interaction' Test Report
In Grand Prix classes throughout the sport of sailing, it is well known that sheeting angles are becoming tighter and tighter – modern TP52s have jib sheeting angles as close as 4 degrees off the centreline. The J109 class in Ireland is a growing and competitive fleet so we felt it necessary to take a fresh look at the sail plan and systems aboard the now nearly fifteen-year-old design with an aim to improving performance.
The J109 have evolved significantly over the past fourteen years. The most visible change has been the shift to a non-overlapping jib setup for optimum IRC performance. This shift in sailplan has a significant effect on the boat’s light air performance due the headsail area reduction.
To compensate for this reduction in power the class uses an inhauling system – this narrows the slot between the mainsail and headsail, in turn increasing the power of the entire sail plan. Up until now the common inhaul point has been the edge of the coach roof – approximately 9° sheeting angle. This is effective in true wind speeds of 15 knots and above – but below this the boat is still relatively starved for power when compared to their genoa flying predecessors – we believe further performance is attainable.
During the winter of 2018 UK Sailmakers Ireland, in conjunction with Pat Considine of UK Sailmakers Chicago, carried out a Fluid-Structure Interaction (FSI) test cycle to determine the effectiveness of jib inhauling to a sheeting angle of 6° - just inside the halyard turning blocks on a standard J109.
It quickly became clear that simply raising the clew of an existing sail and inhauling it harder will not produce a driving force gain. In fact inhauling this hard with a standard jib actually slows the boat below the base lines numbers from the initial set up test. A new design approach is required.
Below we detail the process of an FSI study – and present some of our findings and results.
The Process – Simplified
For the purposes of this article we have simplified the FSI testing process to a number of high level steps.
Target Conditions and Baseline Polars
We decided on a specific set of conditions in which we believed our inhauled setup would perform best – this is 10-12 knots in a flat sea-state. These conditions would allow an amateur helm to steer to the tighter sheeting angle without dropping out of the groove.
With our target weather conditions decided we now gather and input our J109 polar data for the test case. Variables include, but are not limited to, heel angle, leeway, boat speed, wind direction etc.
Design
With our target conditions determined and our polars set we now move on to the design phase.
Our standard J109 class mainsail design is used throughout the testing process – this is consistent and does not change.
As we believe this is a specialised light wind sail we begin with a J1 mould for the jib. Deeper than the standard J109 class jib, which is a crossover between a J1 and J2, the new design is deep with twist for power in light airs.
Initial Setup and Setting the Baseline
With our sail designs selected, we now virtually configure our J109 for sailing in the 10-12 knot conditions present in our test case.
We set the rake, mast bend, sheet tension, halyard tension, outhaul, jib car position, backstay tension etc until we reach the optimum settings –producing the maximum amount of lift for the least amount of drag. To get to this optimum setting requires an iterative process of adjusting, testing, re-adjusting, re-testing etc. This is where the skill and experience of the designer really come in to play to reach the fastest setting possible.
One of the key things in this phase of testing was to set the inhauler so the clew our J1 jib to be touching the coach roof coaming of the cabin top. This places the jib at a sheeting angle of 9° from the centreline.
In this phase, we are looking for performance trends. As we make changes and re-test we expect the trend to be positive – either an increase in lift, or a reduction in drag, both leading to positive outcomes. Once the trend begins to plateau or even turn negative we know we have reached the optimum trim for this particular design.
Once the designer can no longer improve the virtual performance of the boat by adjusting sail controls the iterative process stops. A series of comprehensive FSI runs are then done on this setup to provide a baseline set of data to compare and contrast the next round of test against.
Design Iteration
We now implement our suggested improvements to our J1 jib design. Our aim is to sheet this sail at an angle of 6° from the centreline of the boat – this is just inside the halyard leading blocks of the standard J109 deck layout. We will call our new design the ‘JX’ headsail.
Sheeting to a 6° angle, with no change in jib design, causes the slot of the sail plan to close and driving force to be lost due to increased drag. Simply raising the clew of an existing sail and inhauling it harder will not produce a driving force gain. In fact inhauling this hard with a standard jib actually slows the boat below the base lines numbers from the initial set up test. A new design approach is required.
Design Twist
When a sailor hears twist he or she usually thinks of easing the sheet to induce it. What many sailors don’t realise is that there is twist designed into the shape of every sail – they are made to sail with an optimum amount of twist. For example the standard mainsail design twist is approximately 12°.
Returning to our testing we begin to increase the amount of design twist in our ‘JX’ headsail. As the design twist increases drag reduces, and driving force increases. While adjusting the design twist the virtual trim of the jib is also adjusted to keep the sail trimmed optimally.
Once we see the lift/drag/driving force trend begin to plateau we reach optimum design twist.
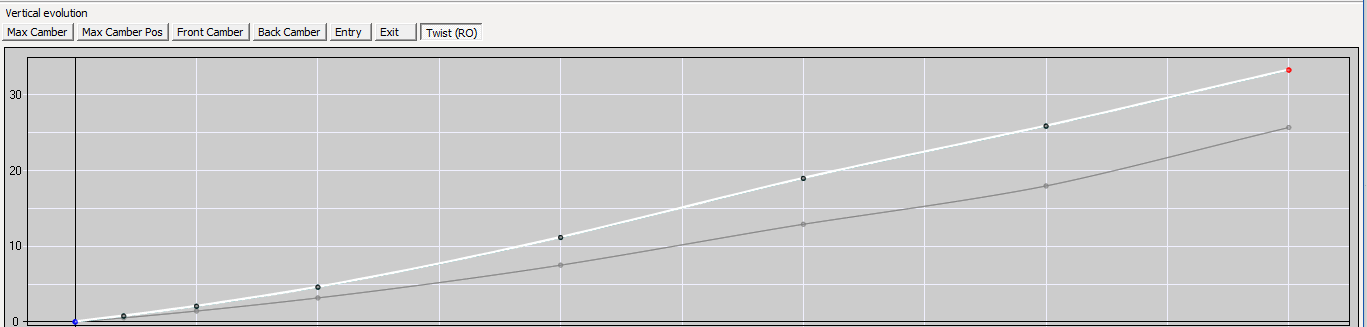 Figure 1 - Vertical distribution of twist
We settle on a maximum of 7.6° increase in design twist distributed vertically. This allows the sail to maintain a consistent twist relationship with the mainsail at the smaller sheeting angle of 6°.
Max Camber Position
When inhauling at tight angles it is very important not to ‘shut’ the slot with a return off the headsail leech. A leech hook or return at such tight sheeting angles causes an enormous amount of drag while also clogging up the slot. A straight exit off the leech is needed. A leech hook or return is often cause by the depth of the headsail moving aft towards the leech. This causes the entry to become fine and the leech to close in towards the mainsail – keeping the max camber position forward in the sail is essential.
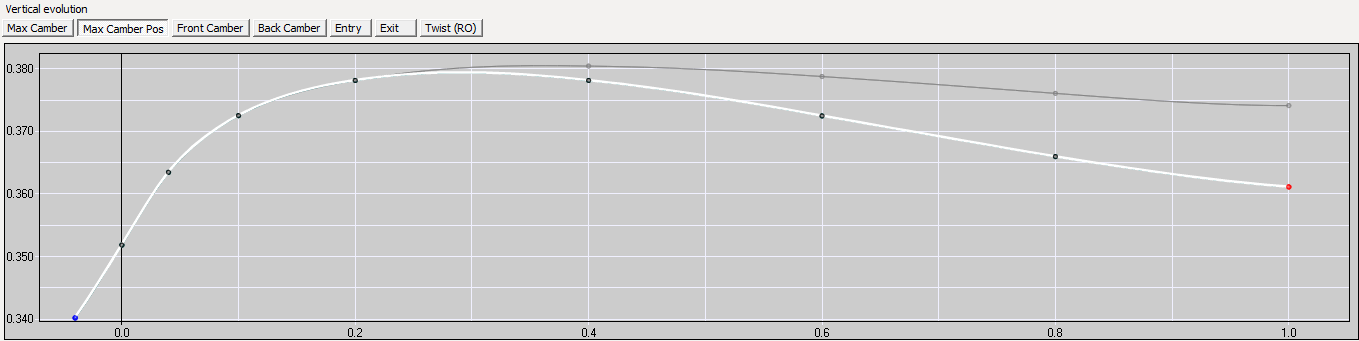 Figure 2 - Max camber position
As we have increased our design twist and brought our sheeting angle well in board we now adjust the max camber position of the sail. Over several iterations we found a gain in moving the max camber position forward. This prevents the upper sections of the headsail shutting the slot.
Camber
Several camber adjustments were made in order to keep the straight exit from the leech of the sail. Notably a reduction in aft camber in the sail’s lower sections.
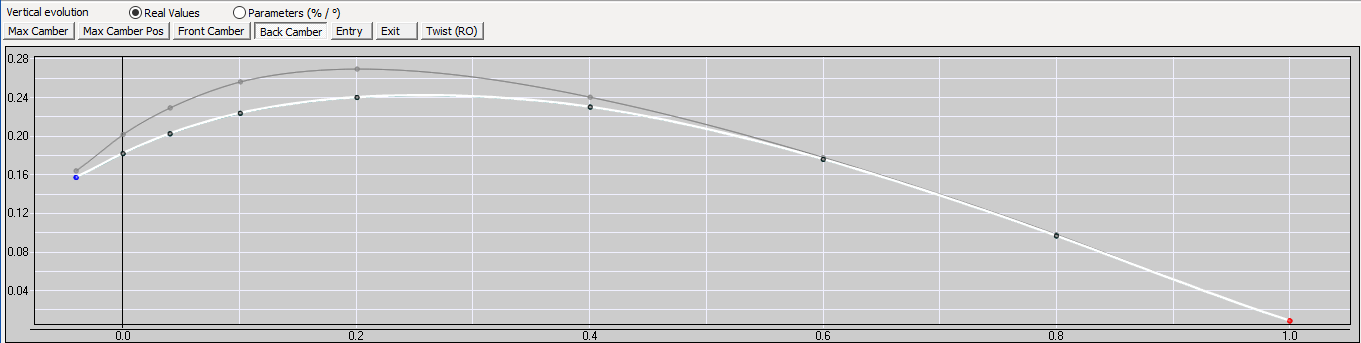 Figure 3 - Aft camber adjustments
As a result, the overall camber in the lower sections of the sail was also reduced. These flatter sections ensure a straight leech exit at maximum inhauling. The lower depth is now controlled by the positioning of the trim point ie the clew position controlled by the trimmer.
This allows a narrower sheeting angle without an increase in mainsail backwinding.
Results - Comparison to the Baseline
Having iterated over our ‘JX’ design for many hours we settle on the new design. We run the same comprehensive set of FSI tests as were run to provide our baseline set of figures. Below we go through some of our findings.
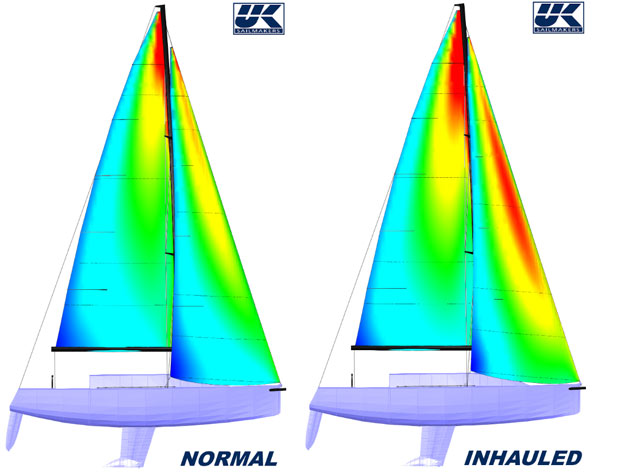 Pressure map comparison
Above you can see our J109 test platform. The left picture is our baseline J1 headsail design. To the right is our new ‘JX’ headsail design. This picture is a leeward view of the sails’ pressure mapping. It can be clearly seen that the ‘JX’ design produces a significant increase in pressure differential when compared to the J1 design.
Not only is there a pressure differential change on the headsail itself but also on the mainsail. This shows how harder inhauling can improve the effectiveness and efficiency of the entire sail plan.
Lift, Drag, and Driving Force
In our FSI testing runs the sail plan is trimmed for proper flow across the luff in 12 knots true wind speed at 37.5° true wind angle. Boat speed of 6.34 knots with 18.8 degrees of heel and 3 degrees of leeway.
Mainsail shape and trim remains constant throughout testing in order to isolate the jib design adjustments.
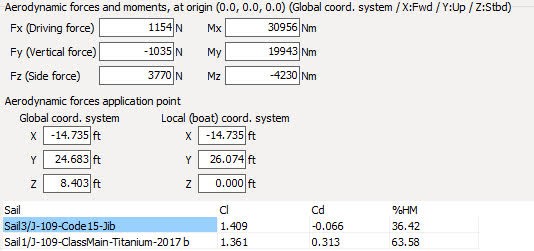 Figure 5 - Baseline performance numbers
Our initial FSI testing provided some baseline numbers for our new design testing.
Numbers of note:
- Fx (Driving Force): 1154N
- Fz (Side Force): 3770N
- Cl (Lift): 2.77
- Cd (Drag): 0.247
Our subsequent FSI testing runs provided a set of numbers for our new ‘JX’ design. Notable numbers below with deltas from previous testing highlighted in green and red for positive and negative changes accordingly.
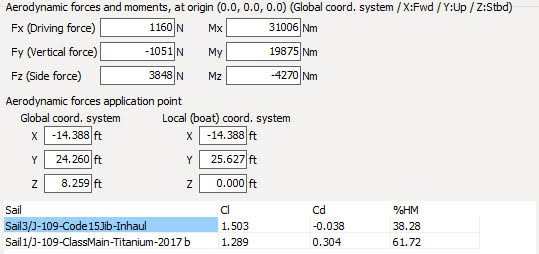 Figure 6 - 'JX' headsail performance numbers
- Fx (Driving Force): 1160N (+1%)
- Fz (Side Force): 3848N (+2%)
- Cl (Lift): 2.79 (+1%)
- Cd (Drag): 0.266 (+7.6%)
With the new ‘JX’ design we are able to achieve a 1% increase in driving force and a 1% increase in lift coefficient of the sail plan.
There is, of course, the associated increase in drag and heeling moment but in 12 knots of true wind speed these can be overcome by righting moment – hike harder.
The other option is to turn the increased lift into height instead of fast forward.
At a true wind angle of 36.5° we maintain the same total coefficient of lift but lose some driving force as a result.
This shows the versatility of the ‘JX’ design. More power and efficiency in normal mode and still very efficient in height mode.
 Figure 7 - 'JX' headsail height mode performance numbers
Mainsail
It must be noted that the mainsail trim was not altered between FSI tests. In reality when at a smaller sheeting angle the mainsail would be brought further to windward to maintain the open slot. This would produce an increase in lift coefficient, side force, and drag. All of which could be overcome by more hiking.
As we all know in this wind speed – whoever gets their crew hiking fully first usually wins.
From Virtual to Real World
In April 2018 UK Sailmakers Ireland’s Barry Hayes, Graham Curran, and Mark Mansfield carried out a two-boat testing session with the newly developed ‘JX’ headsail design as reported by Afloat.ie here.
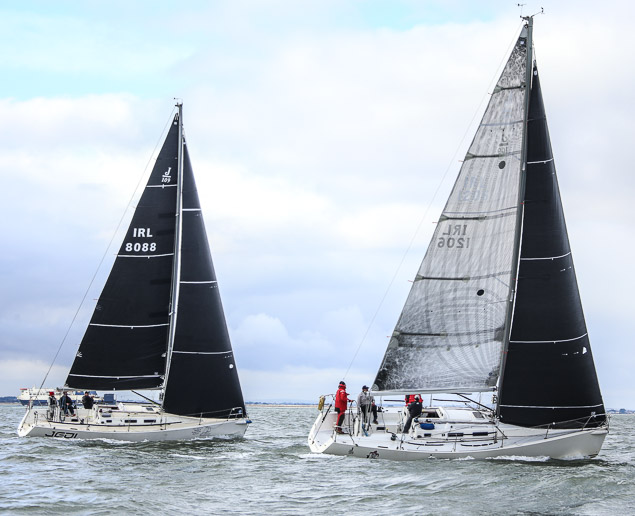 Figure 8 - Two boat testing on Dun Laoghaire Bay
We used two well-matched J109s, including the reigning Irish Class and IRC National Champion “Joker II”.
The test was carried out in ideal conditions with 10-12 knots true wind speed and flat water on Dublin’s Dun Laoghaire bay.
The ‘JX’ headsail was used on both boats throughout testing – with the Joker II’s Championship winning headsail being swapped also. “JEDI” was using a UK Sailmaker’s Uni-Titanium mainsail while “Joker II” was using her own class mainsail.
Several hours we spent upwind testing – lining up bow to bow in the same breeze.
There was a notable difference between the two headsail when both were inhauled hard to a 6° sheeting angle. The ‘JX’ jib remained twisted and fast while the other jib tended to shut out early and cause excess back winding of both mainsails.
Although hard to determine a conclusive advantage it was noted by both helms, independently, that the boat was easier to helm at the tight 6° sheeting angle using the ‘JX’ headsail.
Material Improvements
The J109 is a 14 year old design – you may ask, why wasn’t this done sooner?
The reality is that the material improvements in sailmaking over the last decade have been immense. No so much in what materials are being used, these are fairly constant, more so how they are combined in cloth technology. UK Sailmakers’ Uni-Titanium cloth allows us to build sails with constant draft, depth, and clean leech exits over a large range of wind conditions. Where Dacron or string sails of old would deform and deepen as wind speed increases; Uni-Titanium remains rigid in its design shape. This is essential to modern sail design, particularly sheeting headsails to narrow angles.
Conclusion
Throughout our FSI testing period, it became clear that at closer sheeting angle would improve the overall performance and efficiency of the J109 sail plan. However, we were not convinced that this would be the case in a real-world situation out of the virtual test box.
After on the water test, and several major regattas and a Round Ireland race, we are happy to conclude that the ‘JX’ headsail development has been a success.
"We are happy to conclude that the ‘JX’ headsail development has been a success"
There is much more to inhauling than you may realise. It is common to think of your headsail independently – but it is just one cog in the machine. The relationship between it and the mainsail, and between the sail plan and the underwater profile of the boat must all be considered – they all combine to produce a force which moves you forward, preferably faster than your opponent. If any of these relationships are out of balance then the entire system will begin to crumble.
What is next?
Our virtual and on-the-water testing produced other potential performance improvements to pursue – we are continuing our investment in the J109 class and sailors will be seeing these developments, and more, on Irish waters throughout the coming months.
Helming Techniques: Top Ten Tips for Upwind Sailing
Mark Mansfield, racing consultant and agent for UK Sailmakers Ireland, gives Afloat.ie readers ten top tips on helming techniques. It's an area where he has extensive experience, having competed in four Olympic Regattas, over 30 World and European Championships in various classes, Commodores Cup Admirals Cup boats and many others.
Tip No 1 In lighter airs, steering upwind, try and steer to a higher telltale than normal. If you steer to the lower, normal telltale, you will find in lighter air that the upper forward area of your jib is luffing a bit and as a result power is lost. Better to steer to an upper telltale, even if the lower telltale is telling you to come up. You may initially find you are sailing a bit lower, but you should be faster and that extra speed will then allow you to put the bow up again. The biggest mistake in light airs is to pinch too much. Telltales are a powerful tool to help with sail trim. There are two types of telltales, luff and leech telltales. Luff telltales show what is happening with the wind as it goes over the luff of the sail. Instead of waiting for the sail to luff and slow you down, using the telltales allows you to correct the sail trim before the sail flaps. Use your telltales to help trim the sail and help with your steering upwind.
Tip No 2 In Strong winds (say over 15 knots), you should really be steering mainly to heel, and not to the telltales. Yes, keep an eye on the telltales, but it is very important not to be overheeled, which allows the boat to slip sideways. If the heel gets too much, try and sail a bit higher until it gets back to the normal heel angle.
 Heavy air sailing in a Flying fifteen 20-foot keelboat Photo: Afloat.ie
Tip No 3 No 2 point leads me on to the art of scalloping. Every top helm develops this. It is the ability to be sailing upwind quickly at a normal angle and then to take a 5 degree or so luff up for a few seconds, without losing speed, and then to bring the boat back again onto the original Normal angle, thus achieving a half boat length or so benefit to windward. Often this is achieved when the helm feels a gust just hitting the boat and rather than react by pulling on the helm(and creating drag) he does the opposite, and lets the bow drift up towards the wind for a few seconds, waits for the boat to get to the correct heel, then pulls the bow away again slowly to the angle that has a normal helm angle. All of this results in a gain to windward, with little, if any, speed loss.
 Hubo, Going upwind on a knife edge. Uk Uni Titanium Jib and main
Tip No 4—Most boats should have 3-5 degrees of weather helm in medium winds, to allow the rudder to provide lift. The Yacht Designer would have positioned the mast and keel to achieve this originally, so it is important that your boat still has this. If not, it could be that your mast rake or sail size is not correct. Your Sailmaker or Professional sailor could help you out with this if your boat either has little or no helm, or too much helm. In Light winds, often there won't be much weather helm, and moving crew weight to leeward is often needed to heel the boat and start providing some feel to the helm. It is important though, once weather helm starts to come back, that crew who were to leeward are gradually moved back to the high side.
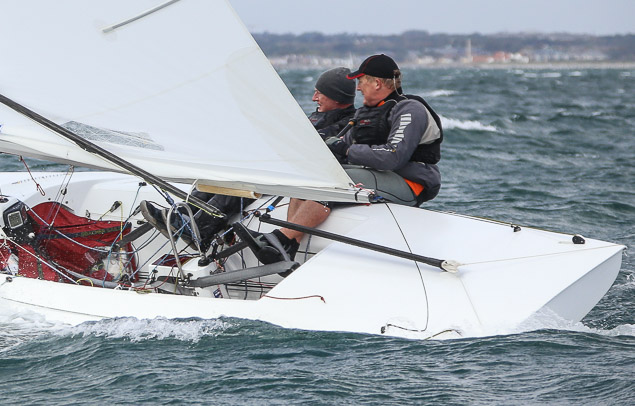
 Fools Gold, On a lovely heel angle, sailing upwind
Tip No 5-- If you steer with a wheel, you should have 3 clearly obvious marks on the helm. At the very top of the wheel, in the middle should be a mark showing the rudder centralized. Then either side of this should be a mark showing say 4 degrees of helm. The reason for this is so that the helm, and in particular the mainsheet trimmer, can look and see how heavy the helm is, particularly in medium and strong winds. The mainsheet trimmer should be looking to see, going upwind, that the side mark is now in the middle, showing the boat has circa 4 degrees of helm. If he notices that it has gone beyond that, then he should be depowering the main by dropping Traveller a bit or extra backstay. To find a 4-degree position on the wheel, you could use a protractor on the quadrant or else a protractor on the rudder when the boat is out of the water.
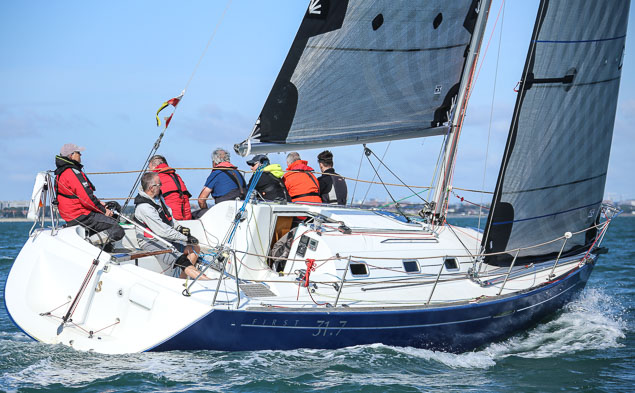 A tiller-steered Beneteau 31.7 on Dublin Bay Photo: Afloat.ie
If you steer with a tiller, then you just have to work out the 4-degree angle and visually get a feel for when the tiller is too high.
Tip No 6 When tacking, especially in stronger winds, one of the biggest mistakes is turning the boat too far after the tack. This results in it being very hard and slow for the crew to winch in the Genoa or Jib. The boat then goes sideways, the helm gets too heavy, and the boat then semi broaches back up into the wind. All the time getting slower. If you don’t have a good feel for where to point the boat after the tack, try and work it out mathematically. Before the race go onto each tack upwind, and check your heading on both tacks. The difference between the two tacks is your tacking angle. So say you are tacking through 80 degrees. During the race, before you tack, look to windward about 80 degrees from where you are heading and see if you see a point on the land, or maybe another yacht and set that as where you should be pointing after the tack.
 SB20 and All Ireland champion Peter Kennedy completes a tack Photo: Afloat.ie
Tip No 7—How to tack. Tacking isn’t just a matter of putting the helm over. There are various different speeds that should happen to the movement of the helm during a tack, particularly in medium and strong winds.
In Light airs, it likely will be a smooth similar movement as the important thing is to get onto the new tack quickly and not lose speed too much through the tack. In lighter airs, always come out a bit lower than your normal angle, in order to build speed after the tack. When the speed builds a little, and some feel comes into the helm, then the bow can be put up again to the normal angle. In stronger air, there is a different technique. Initially, going into a tack, let the bow come up 5 or 10 degrees slowly which allows you to gain to windward, then it needs to go through up to head to wind and beyond fairly quickly. Finally, beyond head to wind, you should slow down for a second to allow the Jib sheeting crew to gather in the slack of the Jib sheet, then you press the boat further to the Normal windward angle. This allows the Jib to be sheeted in quicker. It is very important, for the balance of the boat, that the Jib gets sheeted in quickly as if not, too much weather helm will result if the Jib is loose and the main is in and that is slow. If a tack is not good and the jib does not come in quickly, the mainsheet person should ease the main a bit to help the Helm with his likely weather helm problem.
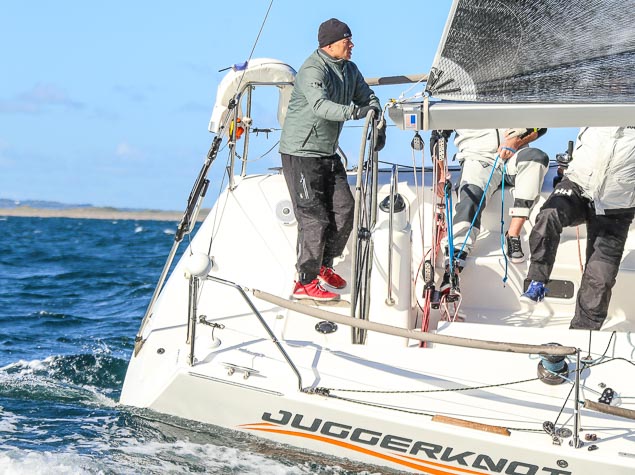 J109 National Champion Andrew Algeo at the helm of Juggerknot Photo: Afloat.ie
Tip No 8—Wheel steering—A wheel does not have the same feel as a tiller and it is important not to grip the wheel hard with little wheel movement. Very often I can see owners sitting on the side, holding the wheel, often in strong winds and big waves, with very little movement of the wheel. I nearly always stand when steering with a wheel in stronger, big sea conditions, as it allows you to make larger movements of the wheel than you can do if you are sitting. Also, it allows you to see over the sitting out crew so you see oncoming waves and gusts, and react to them before they hit you.. Very many wheels nowadays have gearing that allows small wheel adjustments to be made easily, but in order to make a 10-degree adjustment, it may need 2 or 3 feet of wheel movement and that is very difficult to do while sitting. In flat water, sitting may be fine as there is not as much adjustment needed, but I still favour standing, if at all possible.
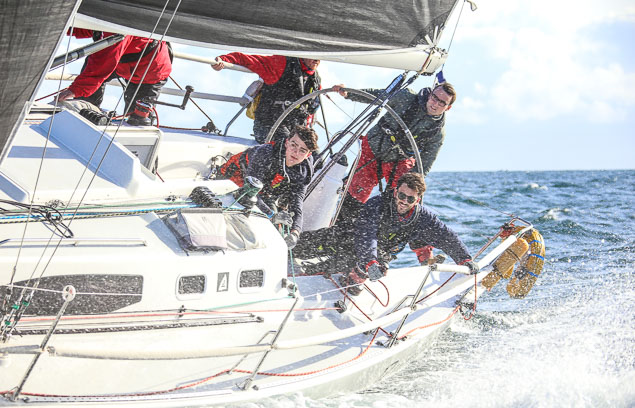 Former ISORA J109 offshore champion Ruth Photo: Afloat.ie
Tip no 9—The less you move the helm, the better. This may seem to be contrary to my comments in Tip no 8, But the reality is moving the helm causes drag and the less you move it , the faster you will be. In Strong winds, with big seas, you will, for sure, need larger helm movement.
In flat water, if you can get the helm at a nice 3-5 degrees of Weather helm, and the boat tracks upwind nicely, then only really small slow movements of the helm are needed. It is another common Helming weakness that I often see, of Helms trying to sail a keelboat, like they are sawing wood. Constant movement. Remember the lift off the rudder is maximized by having weather helm, if you are constantly moving it you go from having no helm for a second to having too much. If you get a lift, a slow push on the helm until you get to the right angle is all that is needed. Likewise, if your weather telltale if lifting showing you are too high, a slow bear off is needed, not a big quick pull.
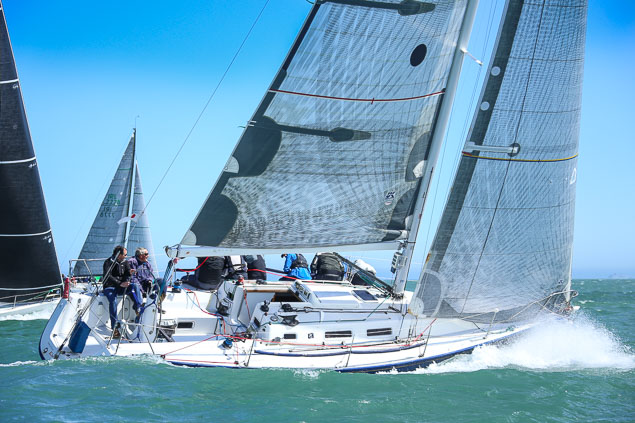 Brian and John Hall's J109, Something Else trucking upwind from with her all-purpose Roller headsail. Sails provided by UK Sailmakers Ireland
Tip No 10 Finally, owners could consider getting some Helm coaching. You probably think, I would say this, as I do a lot of coaching, much of it with Helms. However, it is likely the area that can produce the quickest performance gains for the team. There are at least 5 or 6 good keelboat coaches in Ireland, many with good levels of helming experience, and it is well worth considering using one of them.
In my next article on Afloat.ie, I will concentrate on my top 10 tips for steering Downwind, including steering around marks, steering while hoisting and lowering spinnakers, strong wind gybing, preventing both windward broaches and the deadly chinese gybes, steering at starts, light air downwind angle steering and some other topics too.
How to Control Your Mainsail & The Vang
Your mainsail vang (or kicker) is the sail control all of us know. For those of us who grew up sailing from a young age, we’ve had it from Optimists to Lasers, to keelboats and beyond. But do you know when to use it, and as importantly, when not to? In this article, Graham Curran of UK Sailmakers Ireland takes us through some of the do’s and don’ts of mainsail vang trim.
What is the Vang for?
Your mainsail vang is used to control the vertical movement of your boom. When your mainsail is hoisted and filling it will naturally try to lift your boom – the vang holds the boom down. As a result your vang directly limits the amount of twist in your mainsail.
As we transition from upwind, to reaching, to downwind, in various wind conditions – the vang’s role changes and becomes more, or less, important depending on the situation.
For the purposes of this article, we will assume we are sailing a keelboat with a traveller car and mainsheet setup.
Pre-start and Mark Roundings
During pre-start and at the weather mark you should have a set vang tension to apply. In 10-12 knots of wind sail upwind. Have your mainsail tell tail breaking 50% of the time. At this point, pull the slack out of the vang and apply a coloured tape mark to your vang piston where the purchase block lies. Use this as your ‘mid vang’ setting for pre-start and mark roundings to ensure your boom does not rise unintentionally – check this for the conditions you are sailing in and adjust accordingly.
Upwind
Never, never, never have your vang on while sailing upwind. A crucial component of efficient upwind sail trim is twist. Different amounts of twist are needed depending on the prevailing wind conditions.
When sailing upwind twist should be controlled using mainsheet tension, and correct twist determined using the mainsail tell tails. If your vang pulled on hard you will not be able to add twist by easing the mainsheet.
I don’t know how many times I’ve heard – “take the slack out of the vang” – while sailing upwind. Doing so instantly limits the amount of twist in the sail to whatever is there at that precise moment.
When the boat falls into a lull and the mainsail begins to stall more twist is needed – the main sheet is eased, but nothing happens, so the mainsheet is eased more and more until the tell tail eventually flies – but now the entire mainsail has been left to leeward, the slot has shut, and the boat feels lifeless. If the vang was left slack the boom would be able to rise and the mainsail would twist at the top – bringing the tell tail to life – without losing power from the lower sections of the mainsail, and without dropping the boom to leeward and closing the slot.
When the boat is hit by a gust the mainsheet is eased to depower the sail and unload the helm but, as above, the vang holds the boom down, not allowing the sail to twist, so more mainsheet is eased and the mainsail begins to backwind due to closing the slot. With a slack vang, the boom is allowed to rise when the mainsheet is eased. The top section of the mainsail twist open and reduce the power of the sail where it has the most effect due to the law of the lever. The slot remains open and free as the boom rises rather than being left to leeward, and the helm unloads allowing the boat to accelerate.
When sailing upwind ignore the floppy rope at the mast and resist the urge to pull it tight. Never pull your vang on upwind.
When to pull your vang on upwind
I know, I said never pull your vang on upwind. But in some circumstances it can help, two specifically:
1. In light wind and choppy conditions, it can help to have the vang on hand tight to stop the boom from bouncing erratically. Constantly check that your twist is correct using your tell tales, adjust your vang tension to a good ‘middle ground’ setting until some breeze fills and the sail becomes more stable.
2. In very heavy airs where your traveller is completely to leeward and you are still easing mainsheet to keep the boat upright. In this situation, the mainsail will begin to completely flap and flog when the mainsheet is eased. As we all know – “a flappy sail is not a happy sail” – it will provide no power and cause a lot of drag. It is more efficient in the scenario to pull your vang on to tighten the mainsail leech, to stop it from flapping, and ease the mainsheet to ‘bubble’ the luff of the sail while keeping power in the leech. You are in effect driving off the leech of the mainsail. When in this situation ensure your outhaul and Cunningham are pulled on hard, and your backstay is at maximum tensions to flatten the mainsail as much as possible without inverting it.
Reaching
When reaching the vang main is the only control which effects mainsail twist. As your boom is eased beyond the quarter of the boat the mainsheet is no longer effective at holding the boom down, so the vang takes over.
A good indicator of good vang tension is if the top batten as close to parallel with the boom as possible, usually ending up at 25° off parallel.
We are all familiar with the panicked “BLOW THE VANG!” call, often it comes far too late. When tight reaching in windy conditions it is important to be proactive rather than reactive with the vang, especially with a spinnaker up. Don’t wait for the call, have the vang in hand and feel the boat. If the angle of heel begins to increase rapidly in a puff then ease the vang until the heel angle stops increasing. Let the puff roll through. When the boat begins to flatten after the puff pull the vang back on slowly, continuously feeling how the boat is reacting.
Running
As with reaching the boom is eased further outboard when on a run. The mainsheet is now completely ineffective at controlling mainsail twist. Pull your vang on to keep your top batten parallel to the boom. This keeps the mainsail fully projected to the wind and causes the most drag which, contrary to other points of sail, is exactly what we are looking for when sailing downwind in displacement mode.
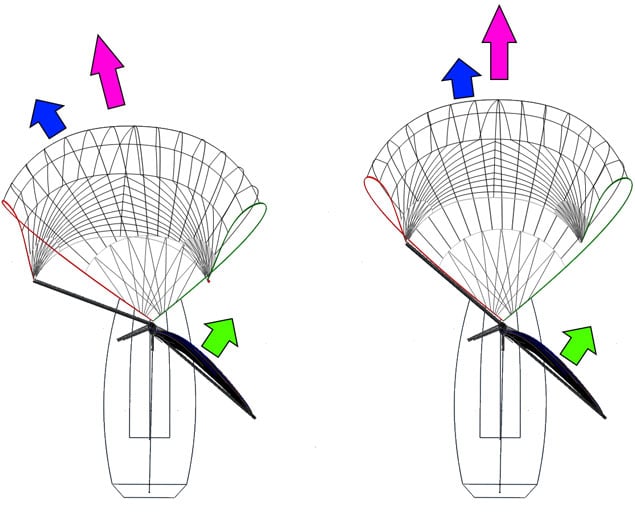
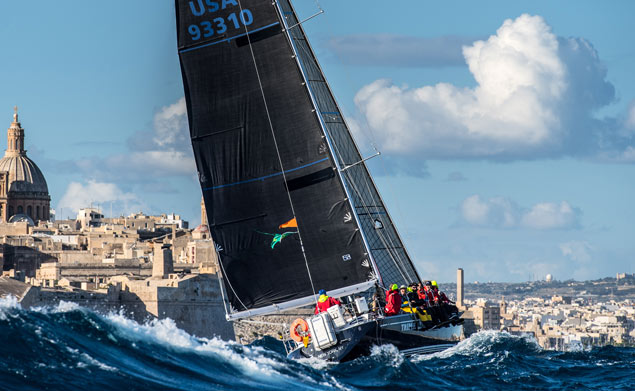
A common and fatal mistake when running downwind in heavy airs is blowing the vang when the boat begins to roll downwind.
This roll is caused by the spinnaker and the mainsail becoming unbalanced. Instead of the resulting forces pushing the boat forward, it drags the boat to windward, initiating the roll sequence.
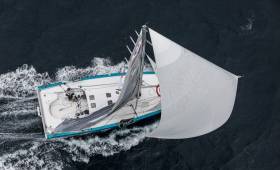
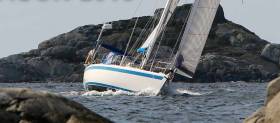
If left uncontrolled this roll eventually leads to an unintentional jibe and broach (see photo below).
The solution to this problem is to equalize the forces of the spinnaker and mainsail. This is done by both easing the pole forward and sheeting on the spinnaker, or by powering up the mainsail by ensuring the vang is at the correct tension and pumping the mainsail into the centre.
Sometimes a death roll can occur suddenly and cause panic. In this panic someone blows the vang, thinking it will prevent a broach, as it does on a reach. The opposite happens, the mainsail depowers completely, the little green arrow disappears, and the spinnaker happily drags the boat to windward, jibes the boat and someone, usually the bowman, ends up with wet feet.
Set your vang tension using the top batten angle to the boom as a guide, and do not blow the vang to solve a death roll downwind.
Conclusion
This is certainly not an exhaustive breakdown of how to use the vang. More so some guiding principles to start with. Every boat is different, what works on some does not work on others. Some boats such as SB20s and other sports boats rely heavily on the vang for mast bend. In order to find the best solution for your boat you need to start from a baseline – I hope this is what we have provided in this article.
The vang is one of those underappreciated sail controls which is often not given much thought. Ultimately it can have a major effect on the performance of your boat. Next time you are out sailing give the vang some extra thought and see how it is used on your boat currently – experiment, assess, and learn.
Heavy Weather Sailing Tips

With the DBSC Turkey Shoot Series starting soon on Dublin Bay and Autumn Leagues in full swing in Crosshaven, Howth, Kilrush and elsewhere, Barry Hayes from UK Sailmakers Ireland gives some tips on how to effectively handle your boat in heavy airs. Having done many big offshore races including the Round Ireland, Fastnet, Newport to Bermuda, and China Sea he passes on his top tips for sailing in heavy weather.
Heavy weather sailing is safe and easy when you set your sails correctly for the conditions and the ability of your crew. Always have a “Safety First” sticker on the main hatch sliding door - it should get everyone in the right mindset before heading on deck.
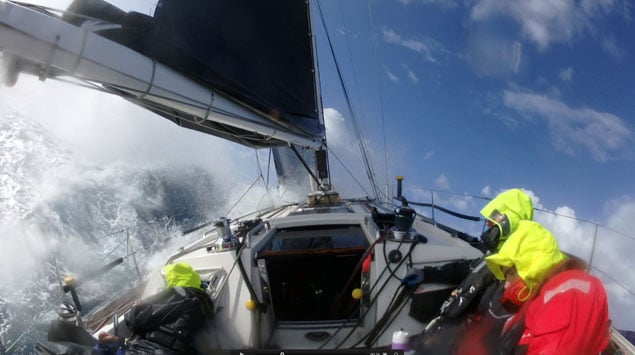 Heavy weather beating
Sailing upwind is the hardest of all points of sailing in heavy weather. In anything over 30–knots, it is really fetching to weather with a J4 and one or two reefs in the main. I always go with less mainsail area and more Jib area as you get much more control over the boat. I hang onto the J4 until both reefs in the mainsail. There is no point pinching as you need speed to get through the waves.
"There is no point pinching as you need speed to get through the waves"
Sit your crew well aft and move anything you can to the aft section of the boat to keep the bow out of the waves and the rudder as deep as possible. Tape all the bowlines on your jib sheets before heading out, so they don’t shake free in the tacks.
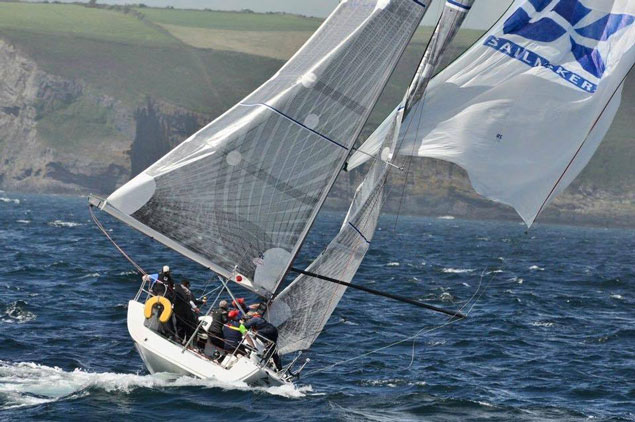
 Power reaching
When you’re reaching an outboard sheet is essential so you can ease the boom out without washing out the mainsail. Again; try and run with more headsail area than mainsail area. It will be easier to control the boat and sail in a straight line. Having a storm Jib set as a staysail inside your J4 can help push the bow away and make the boat easier to sail on a reach. The goal is to reduce weather helm, eliminate broaching, and maximise straight line sailing.
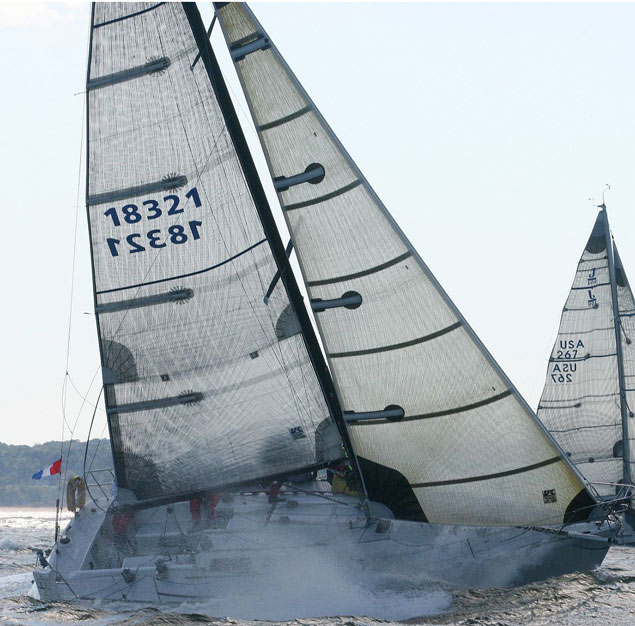
 Heavy downwind sailing
An A5 or a Code zero are excellent tools for going downwind in massive airs. Personally, I prefer the code zero as you furl it if you have a wipeout and leave it up until you are recovered and settled.
An A5 is always a letterbox drop. Rig a spare rope which goes from the windward side, between the mainsail and the boom, and onto the loaded spinnaker sheet with a large bowline. Pull this line to get the kite tight onto the mainsail so you can take the sail down safely.
Instead of trying to soak low in heavy airs it nearly always pays to sail a slightly higher course than the low rhumb line. Drop the spinnaker, and gybe - sailing a short distance on a two-sail reach under control to the mark. Trying to gybe in 30+ kts is asking for something to go wrong. The possibility of broaching on this slightly higher course is considerably less.
 (Above and below) Safety line positions
Crew Safety
I always like to run a second safety jackline on the cabin too. This jackstay goes from the clutches around the fount of the mast and back to the other side. This is excellent if you’re going forward to clear a line or clip a halyard away. It's also great for crew crossing the cabin top in the tack. If the boat broaches you are as close to the centre line as possible. I also add another lanyard to the stern. If someone does go overboard it's quick and easy to clip them to the boat for a fast recovery.
What sails to set and when
|
Wind |
Headsail |
Mainsail |
Spinnaker |
Crew |
|
20 kts |
J 3 |
Full Main |
A 4 or S4 |
Rail |
|
25 kts |
J 3 |
One Reef |
A 4 or S4 |
Rail |
|
30 kts |
J 4 |
1 or 2 Reefs |
A5 or Code zero |
no one in front of the shrouds |
|
35 kts |
J 4 |
2 Reefs |
Code zero |
no one in front of the shrouds |
|
40 kts |
Storm Jib |
2 Reefs |
Anchor Drogue |
Cockpit only |
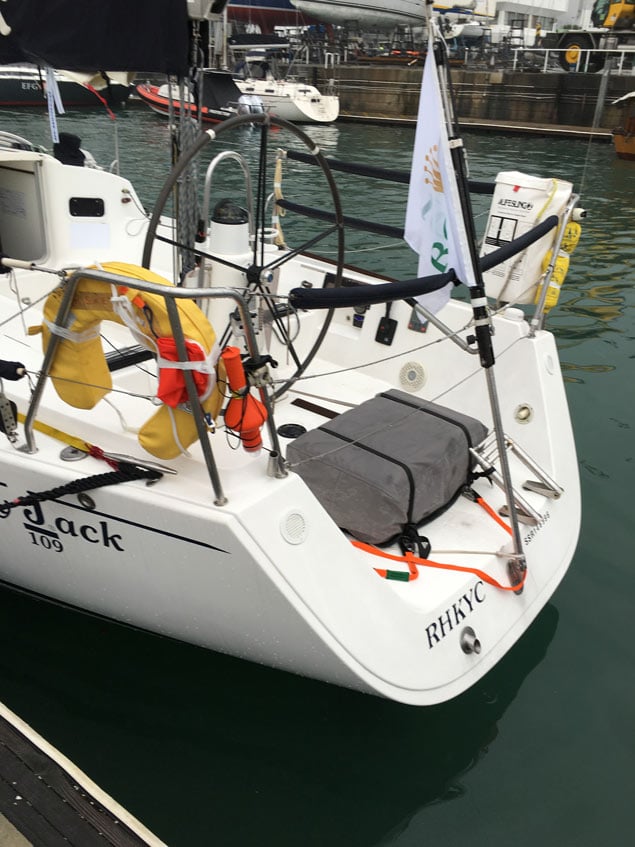
 Storm Sails
Storm Sails
In this photo above, you can see a really effective storm sail setup. The crew of the trysail is strapped to the boom. With a safety strap around it. The boom is set to leeward. You should only fetch with your storm sails - never try and beat to weather. I always go out and test my storm sails in heavy weather to know how to set them. It is also a really good time to learn how to steer with them. It is very different to sailing with normal sails as is a lot less power to steer with.
If you need any other tips or advice please feel free to contact me at the details below.
Stay safe and enjoy your sailing.
Servicing Harken Deck Gear: Winches, Cleats, Blocks & Travelers

Harken agent Barry Hayes from UK Sailmakers Ireland gives some top tips for improving your boat and servicing your Harken deck gear. Barry has been working at the highest level with Harken for 15 years, dealing with boats from Maxis, TP 52s, high-end racing boats, cruising boats and dinghies.
With winter fast approaching, planning your winter service starts this month with deciding which of your deck hardware needs to be cleaned and serviced, and which needs to be upgraded for the start of spring. Harken provides extensive service and upgrade manuals to help you get your boat race ready for the coming season.
Start by making a list of the deck gear you have on your boat, be it big or small. For example: four winches, two genoa tracks, one mainsheet track, four cleats and ten blocks.
To get started on finding the information you need to service your Harken deck gear you will need to identify your tracks and winches. Winches will have a number on the top to identify the size (for example 46.2). For the mainsheet and genoa tracks, all you need is the width of the track and the length of your car(s). Take a picture of your cars and winches for future reference.
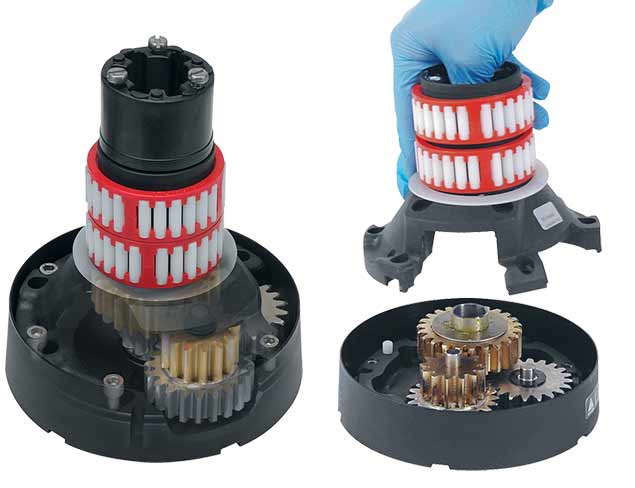
Winches
Cleaning and servicing your winches is simple. Once you have identified your winches, you can find the relevant service manuals on the Harken website. For example:
This will give you a full overview of all the parts inside your winch and how to service it. You can order extra pawls and springs, winch grease and pawl oil, or a full-service pack which includes all three. There are videos available online showing how to strip your winch and which parts to clean:
Top Tips:
Use more pawl oil and less grease! Bring a newspaper and a bucket, so you can keep the boat clean and the parts on board – cut a hole in the newspaper the size of the winch, to catch any drips. When you tighten the screw in the top shaft on the winch, just firm is enough.
Electric Winches
If you would like to upgrade your existing winch to an electric winch for ease of use, there are just a few changes to make to the Radial or Performa winches: you will need a longer central shaft and the motor. For racing, most boats will also need to add an extra battery to the system.
The difference in IRC for an electric stored-power winch is about one point.
Electric winches can often be a great asset for a boat which is short on crew, as it speeds up tacks making racing and cruising easier. An electrician can help you install a winch motor; it can be a bit tricky to get the winch turning in the right direction! Harken’s new digital switches are simple to use and make life easier and safer for you.
Tracks & Traveler Cars
First of all, look at the attached link to identify the style of car you have and the correct process for removing it from the track to service. Then identify the type of car you have using this guide:
Take the ends off the track and remove the car as shown in the link above. Then remove the bearings, clean them and inspect them for wear. If the bearings need replacing, the guide will confirm the type and quantity used for your car. Harken cars use Delrin or Torlon bearings; changing to other materials will damage the cars and track.
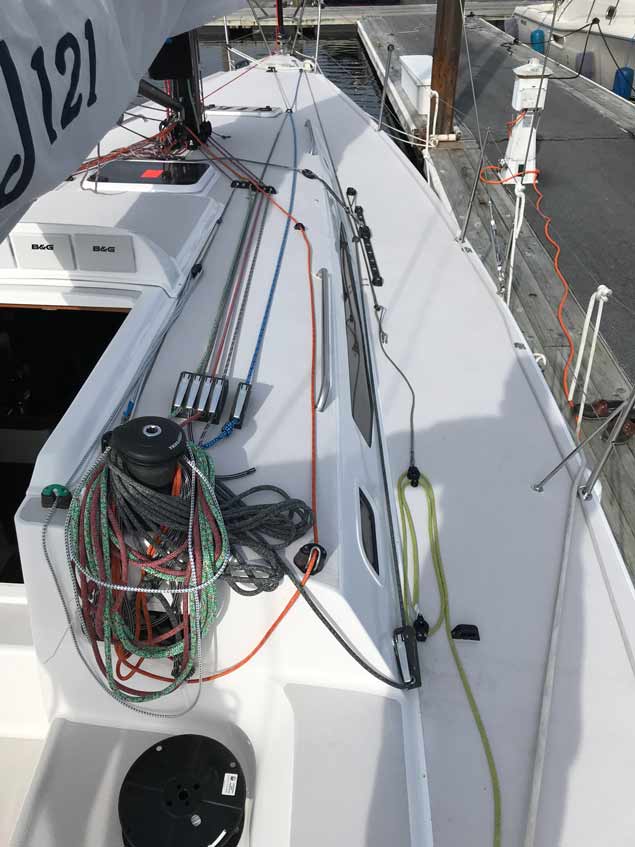
 J 121 deck gear
Cleats
Cam cleats are easy to maintain and rebuild: the Harken 150 Cam-Matic is the most popular and is very simple to service to bring it back to life. Harken can supply service kits for cleats. Giving your cleats some TLC could make your inhauler work better next season – make sure to rinse them with fresh water after every use.
Blocks
Blocks are also easy to maintain: wash them with soap and warm water, then use McLube OneDrop ball-bearing conditioner on the ball-bearings inside block to protect the balls and keep them working correctly (you really do only need one drop!) Check the rope on your soft-attach blocks for fraying, and to make sure they are attached correctly, or check the shackles and split pins are still present and secure.
Mainsail Battcar Systems
To maintain your battcar system, just use soap and hot water! If the system is new, then the ball-bearings will be held captive in the car, so it is easy to remove the cars to clean them with soap and hot water. You can then use OneDrop ball-bearing conditioner to make sure the ball-bearings will work correctly. Replacing the split-pin in the headboard car is always a good idea, to make sure it’s easy to use for the coming season.
If you are worried about your mainsail stack height being too high, Harken provide a fantastic new switch track system for 18mm track. This is excellent for keeping your stack low, and folding your sail neatly at the same time!
Top Tip: The differences between Torlon and Delrin are, Torlon balls are high-load emersion ball-bearings. Delrin black balls are low-load emersion ball-bearings with UV protection. Delrin white balls are low-load emersion ball-bearings with no UV protection.
Winch Handles
You can repair the locking mechanism on Harken winch handles with a Lock-In Handle Repair Kit – this is a cheap alternative to throwing the handle away!
 An example of deck gear layout on a modern cruiser-racer
For more tips on Harken products please go here or email me with any questions at the email address below
Check out the 2019 catalogue to get you started here
How to Optimise Your Yacht Under IRC Rating
Mark Mansfield, Professional sailor and UK Sailmakers Ireland agent, goes through some tips for improving your boat rating relative to its speed. Mark has been involved in many campaigns and projects from Quarter Tonners, Half Tonner, J109’s, Commodores Cup boats, where he has been tasked with the job of trying to improve the boat rating and come up with improvements that will be rating efficient.
Performing better on the race track can be as a result of a combination of things. Of course, newer, more modern and better sails will help significantly, but there are so many other areas that also can assist in making the boat go faster. I will touch on some of these briefly before going on to talk about improving the rating.
Hull Finish
Spend time ensuring the bottom finish is as good as possible. On smaller one designs, this likely would involve fairing the hull, keel and rudder to computer cut templates. However on most IRC boats, this will not be done, so just getting a really good sanded finish is paramount. Then, if antifouling is being applied, try and have it sprayed and, even after spraying, ensure it is lightly rubbed again with light sandpaper to remove the orange peel effect. Nautix does a very good hard antifouling that many race boats use and which can be sanded.
Rig Check
Ensure the rig is straight in the boat and at the correct tension. Your sailmaker will be able to advise you here if needed. Very many boats I have inspected recently turn out to have straight masts as you look up them, but the whole thing is all over to one side making the boat slow on one particular tack. This check requires very accurate measurement to make sure this is correct.
Remove weight
Make sure no unnecessary additional weight is carried aboard. Empty drawers, clear chart tables. Remove Pots, pans, knives and forks. Remove unneeded sails. It is incredible how much weight can accumulate. As a rule, on a 35-foot boat, about every 45 kgs of additional weight will cost you approx 4 seconds an hour. How often, in a 2-hour race, have you been beaten by a few seconds?
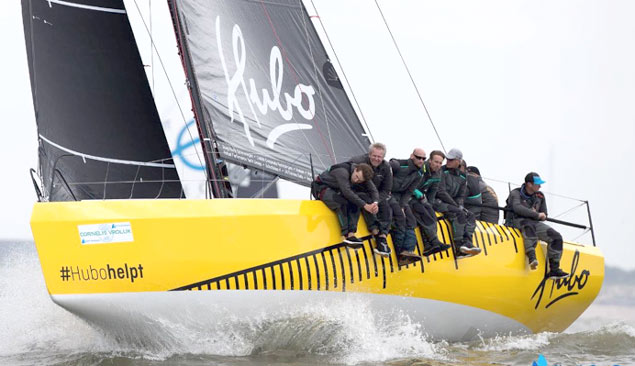
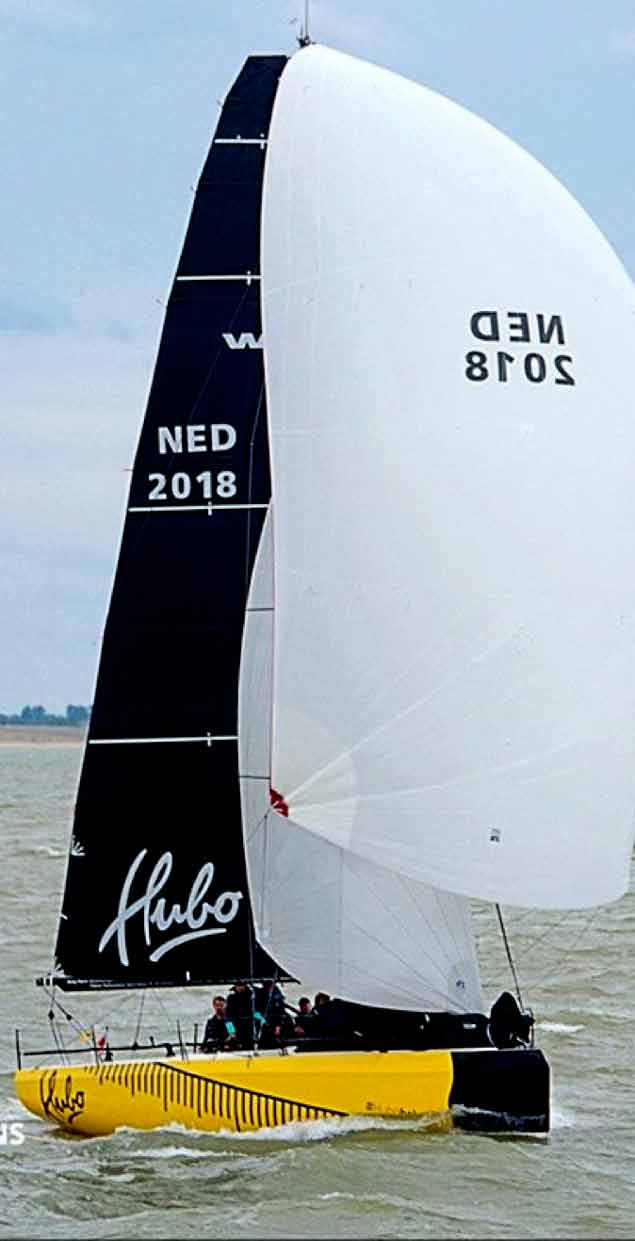 Hubo from Holland on her way to winning the Dutch IRC/ORC Nationals. Sails and IRC Optimisation work was completed by Barry Hayes of UK Sailmakers Ireland
Rig Weight
Remove weight from the Rig. Modern Dyneema halyards are stronger, have less stretch and can be smaller in size. Weight up the mast is so important to heeling effect so a reduction in weight, even inside the mast is significant. If your backstay is a solid wire or Rod, why not look at changing it for a Dyneema one. An aluminium mast could be changed for a Carbon rig but will incur a penalty of 5 or 6 points on a 35 footer. If the mast was a standard carbon one, which might not be a whole lot lighter than an aluminium mast, then it is not likely worth the extra rating hit. If, however, you go for an Ultra-high Modulus Carbon mast, that might be a further 20 % lighter, then that likely would be worth it. The drawback is it is significantly more expensive. IRC does not differentiate between the two, hence the fancy new IRC race boats being built will generally go for an Ultra High Modulus Carbon Rig.
Smooth Systems
Make sure all your sail adjustment systems work smoothly and have enough purchase on them to adjust under load. In particular the Backstay, Jib car adjustment purchases, mainsheet travellers, mainsheet itself. These are the things that are adjusted most often, and they need to be easy to move and adjust with minimal load. Look at upgrading some blocks and purchases if you cannot adjust quickly.
Crew Numbers
Make sure you have enough Crew. Crew weight is moveable and is very efficient in breeze upwind. As long as you do not have a weight restriction, always go for as many as is reasonably possible. Weight is restricted on most one designs. There is a very good reason for that. Extra weight is fast. Also, make as much of an effort as is possible to lean out far. It really makes a difference. Look at the photo of Fools Gold Below to see how they hike and how many they have on the side.
Improving the IRC Rating
Firstly it is essential to understand that improving the IRC rating does not always mean reducing it. Sometimes adding sail area or reducing weight, may lead to an increase in the rating, but these changes may improve the speed by even more than the cost of the increased rating. Most sailors understand that one point in rating costs about 3.6 seconds an hour. However, it is 3.6 seconds if your rating is about 1.000. If your rating is around .900, then it is close to 4 seconds per point an hour. If your rating it around 1.100, then each point is only about 3.3 seconds an hour.
It is important to understand a yachts strengths and weaknesses, and only then can changes be made to the rating.
For example, if a yacht is particularly good in light airs but weak in a breeze, then it is possible that it has too much sail for all-round conditions. Reducing sail area may result in it being still good enough to win in the light, be as good if not better in the breeze, and have a 3 or 4 point rating reduction. Conversely, if a boat is very weak in the light and very good in the breeze, then extra sail area, leading to a higher rating, may be the way to go.
Changing sail area is one thing, but it is crucial that some decent advice is provided by your sailmaker or top sailor in this regard, particularly on whether to increase/decrease headsail or mainsail size. The balance of the helm is so vital in working out which sail the changes should be made to. In general, if your boat has a lot of weather helm, reduce your mainsail area (or increase your Headsail area). If you have little or no weather helm, increase your mainsail (or reduce your jib size).
In technical terms, this is called the Lead (pronounced Leed). It is the balance of the entire boat. Initially, this would be organised by the boat designer, in conjunction with the sailmaker. It represents where the mast is positioned in the boat compared to the keel and compared to the sail sizing. Often, as boats get older, and the configuration changes (say changing from overlapping to non-overlapping jibs), so does the Lead and often this change then should be balanced by changing rake, amending sail sizes or other changes.
 George Sisk's Farr 42, Wow, underwent some significant IRC changes over the winter including a new fin keel, deeper than her previous keel. Seen here going upwind with her new UK Sailmakers Ireland Uni Titanium Jib and Main Photo: Afloat.ie
Other IRC Optimisation Handicap Tips
Always remember to remeasure your sails regularly. Modern laminate sails will shrink, particularly the luffs of your Jibs. Even sails that are only a month or two old can shrink and allow a reduction of 2 or 3 points on a 35-foot sized boat. It is worth the cost of this remeasurement to do it at least once during every season.
Spinnaker area is treated quite cheaply on IRC. On a 35 footer, you can get approx. 3 sq metres extra per point. If you have the capacity to increase your chute size, do it. Remember that a standard symmetrical spinnaker with a pole is allowed a specific length pole, without a penalty, based on spinnaker size. It is a formula and, though the formula is believed to be secret, it appears to be the square root of your SPA (spinnaker area) x .456. So a boat with a 100 sq. Metre spinnaker would have a 4.56 m pole, without penalty.
If you decide to increase your spinnaker area, it would be optimum also to increase your pole length. This should make the boat quicker for having more sail, and it will also make it quicker for having a longer pole as the further you can get the pole away from the rig, the faster the boat will go.
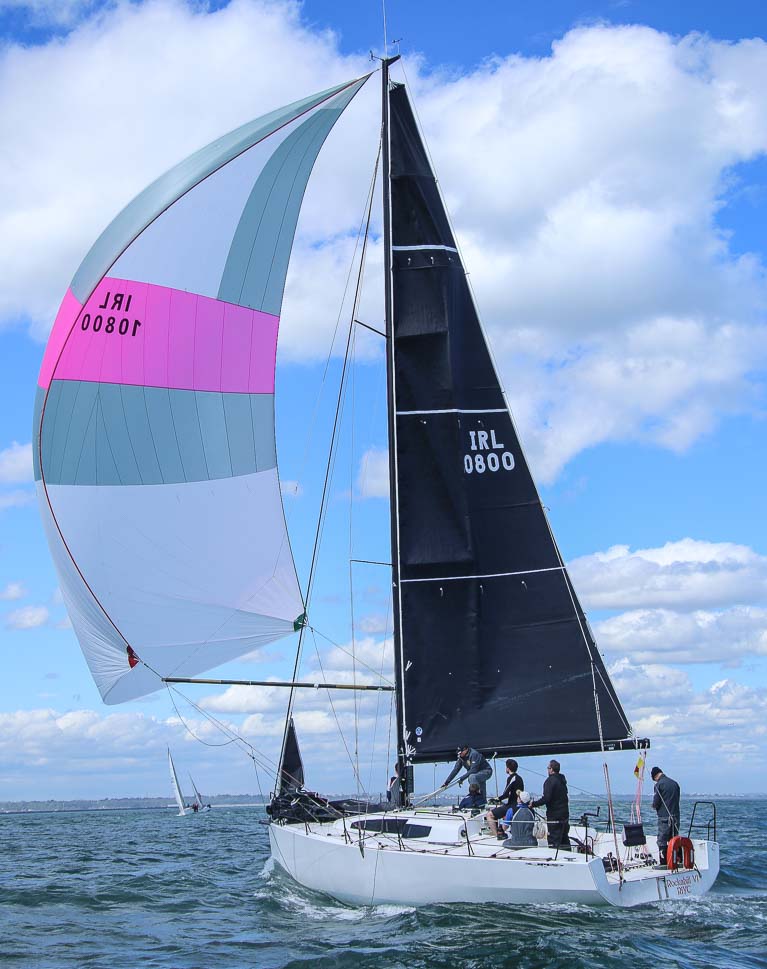 Paul O'Higgins Rockabill VI with her new S2 UK Sailmakers chute in May, which was bigger than her 2017 chute. In this photo, the pole had not yet been extended. Photo: Afloat.ie
In the case of an asymmetric spinnaker, it is not as simple. The formula for this is not well known and only trial certs, sent into the rating office, can answer this question. For example, I have looked at about 20 different J109 certs, and there eventually comes a realisation of what the best sprit length should be, which in the case of a J109 involves restricting it’s length when sailing under IRC.
The displacement of a yacht is also significant. If a yacht is very tippy in the breeze, adding weight in the form of lead can settle the boat down upwind, as the extra weight will also add a little length to the boat as it sits down further, and in a breeze the longer you are, the faster you will go.
This extra weight can be added easily in the bilge in lead, or could even be added to the bottom of the keel if the design allowed it. Very many quarter tonners and half tonners have added keel extensions, but this is easy for them as their keels are similar shape all the way down. In general, an extra 150 or 200 mm on the bottom of the keel is virtually rating neutral as the extra weight(say 100kgs in a half tonner), is equal to the penalty with the extra draft. What it does is make the boat faster upwind in a breeze, but it is maybe not quite as fast then in Light airs. If weight was only added in the Bilge, it appears that every 1% of weight added equates to about 1 point of rating approximate reduction. So say in a quarter tonner(1400 Kgs), you add 60 kgs in the Bilge, you should get circa 4 points back. It appears there is no penalty for adding lead, up to approx 5 % of a boat displacement. After that, the gain brought by adding lead as weight (one point per 1% approx of weight added) is lessened by these extra penalties.
Sail sizing has got to be checked. Under IRC specifically sized mainsails will have default girth (width)sizes which do not involve a penalty. The sailmakers well know these. The length of the Luff is not measured as the black bands restrict these on the Boom end (E measurement) and at the top of the mast (P measurement). Only the girths and headboard form the mainsail measurement. For boats that do not bring their P measurement all the way to the top but have wide girths, it would likely be better to reduce the Girths in the Main and have a longer luff, to avoid the extra penalties.
With headsails, it seems to appear that not going full length on your Jib Luff(called LL) is treated well by IRC. Trial certs on this have produced good rating reductions.
 Rob McConnell's Fools Gold, sporting full UK Sailmakers Ireland Carbon Uni Titanium Main and Headsail on her way to winning Sovereigns week 2017. She benefited on her IRC handicap from a slight Jib luff length(LL) reduction. Photo: Bob Bateman
However, some boats cannot afford any reduction in their headsail sizes. Many boats are now only using non-overlapping Jibs but were originally designed with much larger overlapping Jibs. Examples of these would be J109’s. Beneteau 34.7’s. Half tonners, Quarter Tonners. In the case of the last 2 (half and Quarter tonners), the masts are generally moved further back when they are modernised, as are the Keels, to allow more foretriangle area. In the case of these, lowering the Jib LL(luff length )may be a good option. In the case of the J109 and Beneteau 34.7, the masts are not moved, nor are the keels, so it is important, for the balance of the boat, to maximise the full foretriangle area and so lowering the LL for them is not such a good idea.
Headsail Furlers are not efficient under IRC. There is a small rating gain if you use one large roller headsail plus a very small working Jib. However, this is too restrictive. If you use a roller headsail, even with battens and in a high tech material, it will give you no extra rating benefit and will not be as efficient as a non-roller Headsail. This is because a non-roller Headsail can have long horizontal battens all the way up which allows the sail to have more roach. The sail is also low to the deck which then will get a better airflow on the bottom part of the sail(called end plate effect). Generally, it is more difficult to change a Jib on a roller, so the sails are made more all-purpose, whereas a boat, without a roller may have specific Jibs which they can change for different wind conditions. All this being said, there are boats out there that do well on IRC with rollers. My point is they would likely do even better without them.
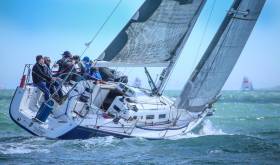
 Brian and John Hall's J109, Something Else from Dun Laoghaire with her all-purpose roller headsail. Sails provided by UK Sailmakers Ireland. Photo: Afloat.ie
Bow down trim can be advantageous on IRC boats, especially if the bow of the boat is already in the water, or very close to it. The reason for this is extra weight placed forward(perhaps lead) will not add a lot of length at the bow, but will lift the stern a lot more. This results in the rated length coming out shorter and so a rating advantage.
Sailmakers have access to the sail size data for all IRC boats, so when owners want to look at changing their sail sizing, the sailmaker can look up successful models of this design which compete elsewhere(maybe the Uk, Maybe France, Holland). This allows them to see precisely what has been working well on other boats and then replicate this for their customer. That is why it is always best to discuss what one wants to do with your sailmaker as they have access to extra valuable information which you may not have.
Getting a boat measured is sometimes regarded as a bit of a Dark art. There is a lot of stories of 'SPECIAL' measurers being less observant or stretching the measuring tape etc. The reality is that to get a good measuring, you need to know what to expect and try and make whatever changes you can in advance, to ensure you get the figures you expect. That means when it is being measured, you know every one of the measurements being taken and if the figure comes out differently, then you query it. Sometimes it can just be a simple mistake, but then is the time to rectify it, not later when you get the rating cert back.
Finally, when you get the cert back, go through every figure and section. If you don’t know what you are looking at, get someone else that does. It is not unknown for there to be inputting errors that can make a substantial difference. Much of the data on the cert involves sail sizing, so your experienced sailmaker, who is used to working with the IRC rule, would be the best one to help you with all this.
At UK Sailmakers Ireland we have three top professional level sailors, two of which are sailmakers, who can help with all the rating optimisation needs. Mark Mansfield is a four times Olympian and has been competing at a high international level on IRC and one design for over 30 years. Barry Hayes, before moving back to Ireland, previously ran the UK Sailmakers Worldwide production facility in Hong Kong and had significant experience over there working on IRC projects. Graham Curran has significant experience in Ireland working on IRC projects, including Fools Gold, which he also sails on.
You should get your sails measured by an In-House Certification (IHC) sail loft so your sails are endorsed and measured by certified IRC - ORC and ISAF professionals. UK Sailmakers Ireland is the only IHC loft in the country.
Contact us if you think we can help with your boat, either by making it faster with new sails or also by helping with your IRC rating.
UK Sailmakers Ireland Offers Seasonal Discounts for 2018
Although there is plenty of sailing to be had at Autumn Leagues around the country, the 2018 Sailing Season is drawing to a close for the majority of us. But this is not a time for despair - rather a time of opportunity!
With the coming of Autumn comes Seasonal Discount season. The perfect time for ordering sails to get the most from your 2019 season.

UK Sailmakers Ireland is offering percentage discounts off our year-round pricing for orders placed and paid for in September, October, and November 2018.
12.5% discount for payment in full by 31st September 2018
10% discount for payment in full by 30th October 2018
5% discount for payment in full by 31st November 2018
Now is the time to take advantage of the off-season offerings.
If you had a moment this summer where you felt you could have won that race and bested your racecourse nemesis with a little extra performance, or perhaps you were frustrated with being delayed on your valuable week of cruising by unseen wear and tear, don't repeat the hardship in 2019.
Call or email us and we can find a solution for your needs - ring in 2019 with a new sail from your Irish Sailmaker, UK Sailmakers Ireland
Top Results for UK Sails Ireland at End of Season in 1720s, ISORA Final Race & Dutch IRC Nationals
A great end of season series of results has put the icing on a fine season for UK Sails Ireland, the first season under the new ownership of Barry and Claire Hayes and Graham Curran.
In the 1720 Nationals, just completed in Baltimore, UK Sails again had a clean sweep. In this hotly contested class, UK Sails filled all top four slots.
"UK Sails have filled all three podium positions in the last five years in both the Nationals and Europeans"
Donagh Good's “Da Fishy” from Royal Cork, with Peter O'Leary on the helm, won from Baltimore's Anthony O'Leary’ in Antix, with Robbie English and Ross McDonald’s Rope Dock from Howth Yacht Club, making up the top three. In addition, fourth place was also a UK Sails boat with Tom Hegarty from Baltimore taking this slot. All four were using UK sails Ireland upwind and downwind sails.
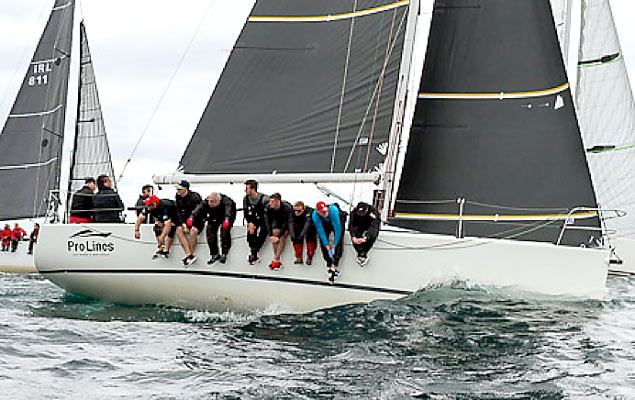
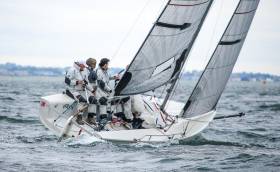
 1720 sportsboat racing Photo: Bob Bateman
UK Sails have filled all three podium position in the last five years in both the Nationals and Europeans in the 1720 one-design class.
In the Irish Sea, the final race of the ISORA Series was held last weekend and was an 80–mile race from Pwllheli to Dun Laoghaire and was won by Andrew Hall's J125, Jackknife. Andrew also has a new J121 which he sails in the Mediterranean on which he will compete in the upcoming RORC Middle Sea Race. Both boats use UK Sails Ireland sail inventories.
 Hubo
Hubo
In Holland, a newly built one-off 36–footer, Hubo just won the Dutch IRC /ORC Nationals two weekends ago. This boat was only launched in May and UK Sails Ireland was asked to kit the boat out with both it's upwind and downwind sails, featuring its Grand Prix Uni Titanium unwind range.


 Michael Murphy Schull Harbour Sailing Club (SHSC), Eric Coogan Heineken Ireland, Mark Murphy, Commodore SHSC, Jack Allen SHSC, Carmel O'Regan SHSC, Cornelious Ndlovu, Schull Harbour Hotel Operations Manager and Derval Murphy SHSC")

